

flight angles, and lighting data. From golden hour to ISO precision.
Table of Contents
Drone architecture photography tips circulate across every platform, yet most repeat the same six bullet points — golden hour, rule of thirds, RAW format — and stop exactly where the real technical complexity begins. The gap between casual aerial capture and publication-ready architectural documentation is not a question of equipment. It is a question of flight logic, sensor physics, global illumination literacy, and post-production discipline.
Professional architectural photographers operating in markets like Rotterdam — where brutalist port infrastructure meets contemporary waterfront towers and EASA drone regulations demand meticulous pre-flight compliance — treat every flight as a data acquisition session, not a creative wander. The American Institute of Architects (AIA) has documented the growing integration of aerial capture in architectural practice as a standard documentation method across project typologies. This guide closes the execution gap with nine verified, technically grounded practices.
Nuvira Perspective
At Nuvira Space, we sit at the intersection of high-fidelity real-time simulation and physical architectural capture. Our workflow pipeline integrates Unreal Engine 5 Lumen global illumination models alongside DJI Mavic 3 Pro telemetry data — not as stylistic choices, but as engineering tools that let us pre-validate drone shot compositions in virtual environments before a single motor spins on-site. The result is a human-machine synthesis where the photographer’s spatial intuition is sharpened by ray-traced previsualization, eliminating the costly trial-and-error loops that still define legacy aerial workflows. Every drone architecture photography tip in this guide has been stress-tested against that dual-reality standard: it must hold up in the field and in the renderer.
Step-by-Step Workflow: 9 Drone Architecture Photography Tips That Work
Tip 1 — Pre-Flight Spatial Modelling
Before you uncase the drone, model the site in a real-time engine. Import the building’s BIM file or a photogrammetry mesh from a previous survey — see our deep-dive on photogrammetry workflows for architecture — light it with the sun position matching your planned shoot window, and fly the virtual camera through candidate angles. This is not optional busywork: it is the single highest-leverage intervention in drone architecture photography. The NOAA Solar Calculator provides arc-minute-precision sun angle data for any GPS coordinate, date, and time — the essential input for any serious pre-flight simulation.
Workflow Specs
- Software: Twinmotion 2024.1 or UE5 Lumen scene for sun simulation
- Sun angle data source: NOAA Solar Calculator — input GPS coordinates + date + time
- Shadow prediction accuracy: ±4 minutes of arc at solar noon
- Output: annotated screenshot set + GPS waypoint list for mission planner app
- Time investment: 45–90 min pre-flight saves 2–3 hrs of reshoots
Tip 2 — Calibrate Your Sensor to the Facade Material
Architecture is not a neutral subject. Polished concrete, weathering steel, glass curtain walls, and terracotta panels each have distinct spectral reflectance profiles. Your drone sensor’s exposure matrix treats them identically unless you intervene. Shoot a bracketed set — three exposures at ±1.3 EV — and use the histogram, not the LCD preview, to confirm shadow detail retention in the 5–15% luminance band where masonry texture lives.
Camera Settings by Facade Type
- Glass curtain wall: ISO 100 · f/5.6 · 1/500s · CPL filter mandatory
- Raw concrete / béton brut: ISO 200 · f/8 · 1/320s · no CPL needed
- Weathering Corten steel: ISO 100 · f/7.1 · 1/400s · +0.3 EV compensation
- White render / EIFS: ISO 100 · f/9 · 1/640s · −0.7 EV to prevent highlight blowout
- All: shoot RAW + JPEG simultaneously; use JPEG as on-site reference histogram only
Tip 3 — Master the Three Canonical Drone Angles for Architecture
Every drone architecture photography tip about ‘unique angles’ leaves practitioners without a systematic framework. The three canonical perspectives each serve a distinct documentation purpose. For a detailed breakdown of how composition geometry applies at ground level, our guide on architectural photography composition provides the foundational spatial logic that scales directly to aerial work.
The Overhead Nadir (90° Gimbal Down)
- Purpose: site organisation, roof geometry, courtyard ratios
- Altitude sweet spot: 40–80 m AGL depending on building footprint
- Lighting: solar noon ±90 min for clean shadow geometry
- Lens equivalent: 24 mm on full-frame sensor standard
The Oblique Diagonal (30–45° Gimbal Tilt)
- Purpose: facade elevation + site context in a single frame
- Flight path: orbit at constant radius, 120–200 m from facade centroid
- Key metric: building height-to-distance ratio between 1:3 and 1:5
- Workhorse of commercial architectural portfolios
The Low Lateral (10–15° Gimbal Tilt, Sub-30 m Altitude)
- Purpose: street-level compression + aerial authority — impossible from a tripod
- Risk: obstacle proximity; requires manual flight, not automated orbit
- Reward: creates the ‘impossible perspective’ that differentiates editorial work
Tip 4 — Golden Hour Is a Starting Point, Not an Answer
Every resource on drone architecture photography tips recommends golden hour. Almost none specify the exact timing delta that separates a competent shot from an exceptional one. The actionable data: the optimal window opens 22 minutes after official sunrise and closes 18 minutes before the sun hits 10° elevation. Beyond that, the shadow length-to-building-height ratio exceeds 4:1 and shadow gradients begin to compress facade texture rather than reveal it.
Lighting Schedule Protocol
- Use PhotoPills or Sun Surveyor to export sun azimuth + elevation per minute
- Target shadow length = 1.5× to 2.5× building height for oblique shots
- Blue hour (civil twilight) requires ISO 400–800 + ND removal + 1/30s minimum
- Rotterdam latitude (51.9°N): effective golden hour window is only 14–19 minutes in winter — plan secondary blue-hour contingency automatically
Tip 5 — ND Filter Stack Strategy
Neutral density filters on drones are not accessories — they are shutter speed control mechanisms that enforce the 180° shutter rule (shutter = 2× frame rate) and eliminate the micro-vibration judder that appears in single-frame stills shot at 1/1000s on a moving platform.
ND Stack by Condition
- Bright overcast, ISO 100, 1/60s target: ND16
- Full sun, ISO 100, 1/60s target: ND64
- Golden hour, ISO 100, 1/30s target: ND8
- Blue hour / interior-exterior balance: no ND + ISO 400–640
- CPL stacked over ND: only when facade specularity control outweighs 1.5-stop light loss
- Avoid ND1000 for stills — diffraction at f/11+ degrades resolution on 4/3 sensors
Tip 6 — Automated Mission Planning vs. Manual Flight
Mission planning apps (DroneDeploy, Litchi, DJI Waypoints 2) handle repeatable orbit passes at pre-set altitudes and radii with GPS-locked consistency. Manual flight handles the unexpected: a gap in the canopy that opens a composition, a reflection angle on glazing that only exists for 40 seconds, the low lateral pass that requires obstacle avoidance override. The professional workflow uses both in a defined sequence.
Hybrid Flight Protocol
- Phase 1 — Automated: run three orbit passes at pre-modelled altitudes (nadir, oblique, high oblique); capture 60–80% of deliverables on automation
- Phase 2 — Manual: 15–20 minutes of reactive capture informed by Phase 1 previews
- Phase 3 — Hover & refine: park drone at the best oblique position, fine-adjust gimbal ±3° for shadow/highlight balance
- Battery management: Phase 1 consumes ~40%, Phase 2 ~35%, Phase 3 needs fresh battery
Tip 7 — Regulatory Compliance as a Creative Variable
In markets like Rotterdam (EASA Open Category A2 / STS-01), Singapore (CAAS UA operator permit + geo-zone approval), and most European city centres, the legal altitude ceiling, lateral exclusion zones, and mandatory pre-notification windows directly shape which shots are achievable. Treat regulation as a design constraint, not an obstacle. The FAA Part 107 framework in the United States and EASA’s equivalent in Europe both require commercial operators to hold certified pilot credentials before any paid architectural shoot.
Compliance Workflow
- File NOTAM / UAS geographic zone check minimum 48 hrs pre-shoot via FAA DroneZone
- Singapore MPA/CAAS: Class B airspace below 60 m requires online permit, 3–5 business days
- Rotterdam port district: temporary restricted zone overlaps Erasmus Bridge approach — requires LVNL coordination
- Document all approvals in a shoot file; include in client deliverable package
- Approved restricted-zone access is a portfolio differentiator — pursue permits aggressively
Tip 8 — Post-Production Global Illumination Matching
The post-production stage of drone architecture photography is where most practitioners lose altitude. The common error: applying the same Lightroom preset to aerial shots that works for ground-level architectural images. Aerial captures have fundamentally different atmospheric scattering, colour temperature shifts (cooler at altitude due to Rayleigh scatter), and reduced micro-contrast in shadow regions. Adobe’s Lightroom technical documentation covers luminance masking precisely — a mandatory technique for separating sky from facade in post. For a rendering-first comparison of real-time post workflows, our benchmark on Lumion vs Twinmotion 2026 outlines how each engine handles global illumination export — directly applicable when validating aerial shots against CG sun models.
Aerial-Specific Post-Production Parameters
- Colour temperature baseline: aerial at 40 m+ is typically 200–400K cooler than ground — warm shift mandatory
- Dehaze slider: +15 to +25 at altitudes above 60 m; aggressive use at low altitude creates artificial HDR artefacts
- Texture vs Clarity: use Texture (+20 to +35) for facade masonry reads; Clarity damages smooth glazing
- Luminance masking: mask sky separately from facade — sky needs −20 to −35 exposure, facade needs +0.3 to +0.7
- Export for editorial: 16-bit TIFF, ProPhoto RGB; convert to sRGB only at final delivery stage
- Ray-trace validation: compare post-processed result against UE5 Lumen render — shadow direction mismatches reveal sensor tilt errors
Tip 9 — Compositional Geometry: Reading Architecture Before Flying
The architectural photographer who reads a building’s structural logic before flying executes fewer passes and captures cleaner images. Every facade has a dominant compositional vector — the primary line direction (horizontal banding, vertical pilasters, diagonal shear) that the camera angle should either align with or cut across at 45–90°. Alignment creates harmony; cross-cut creates tension. Both are legitimate; neither should be accidental.
Compositional Analysis Checklist
- Identify primary structural grid: horizontal (plinth-beam-cornice), vertical (column bay), or diagonal (parametric skin)
- Map secondary rhythm: fenestration repeat interval, material transition joints, setback profiles
- Select camera azimuth: align for harmony (parallel to facade), cross-cut at 45° for tension
- Verify symmetry axis: symmetrical buildings demand dead-centre framing; asymmetric ones read better from the dominant mass
- Check foreground element: street grid, tree canopy, water body — the best drone shots integrate ground-plane context at 20–30% of frame
Comparative Analysis: Nuvira Vs. Industry Standard
Pre-Flight Preparation
Industry standard: Check weather app, charge batteries, fly. Pre-flight planning treated as a logistics exercise.
Nuvira approach: 3D virtual pre-flight in real-time engine with sun simulation. GPS waypoints extracted from virtual fly-through. Zero surprise angles on-site.
Exposure Strategy
Industry standard: Auto-exposure or single manual setting per shoot; adjust in post.
Nuvira approach: Facade-material-specific exposure tables. ND filter stack calculated per lighting condition. Bracketed capture at ±1.3 EV for HDR merge when shadow range exceeds 6 stops.
Post-Production
Industry standard: Apply architectural preset, export JPEG, deliver.
Nuvira approach: Aerial-specific correction model (altitude-adjusted colour temperature, luminance masking, Texture over Clarity). Ray-trace validation against UE5 sun model. 16-bit TIFF archival delivery + sRGB client copies.
Regulatory Compliance
Industry standard: Check no-fly zone app day-of. Avoid obviously restricted areas.
Nuvira approach: 48-hour pre-notification standard. NOTAM filed. Permit documentation included in client deliverable. Restricted-zone access actively pursued as portfolio differentiator.
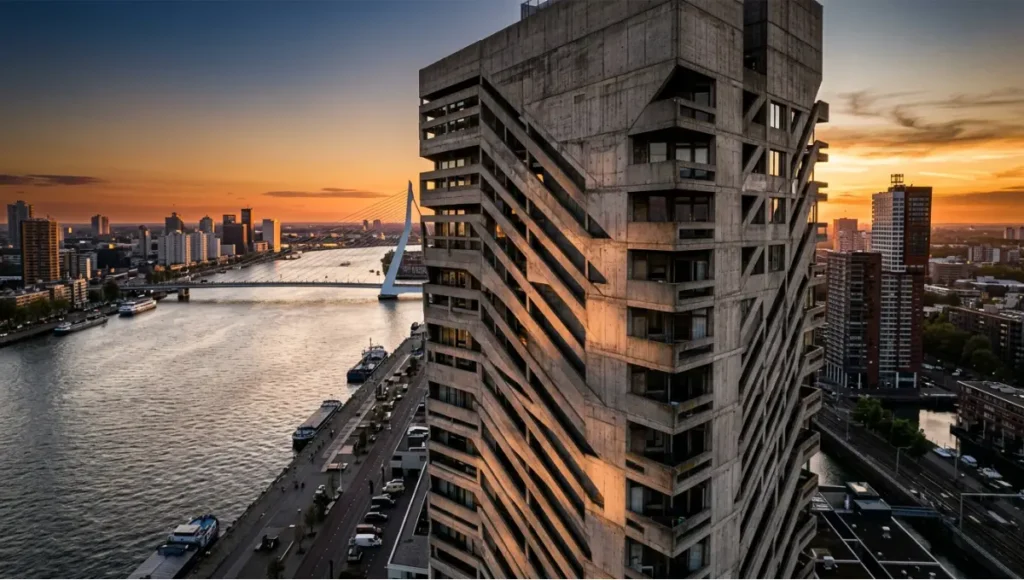
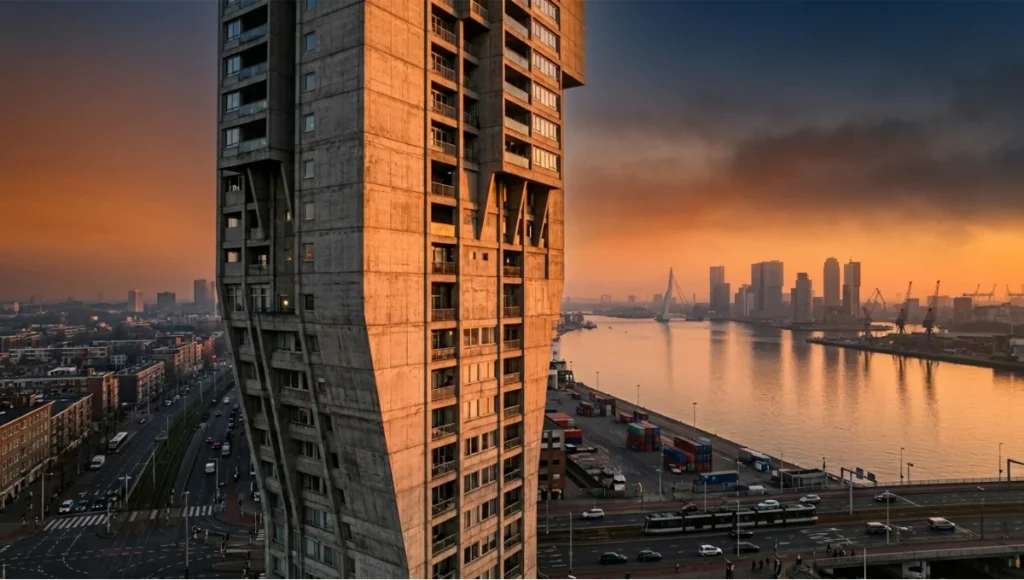
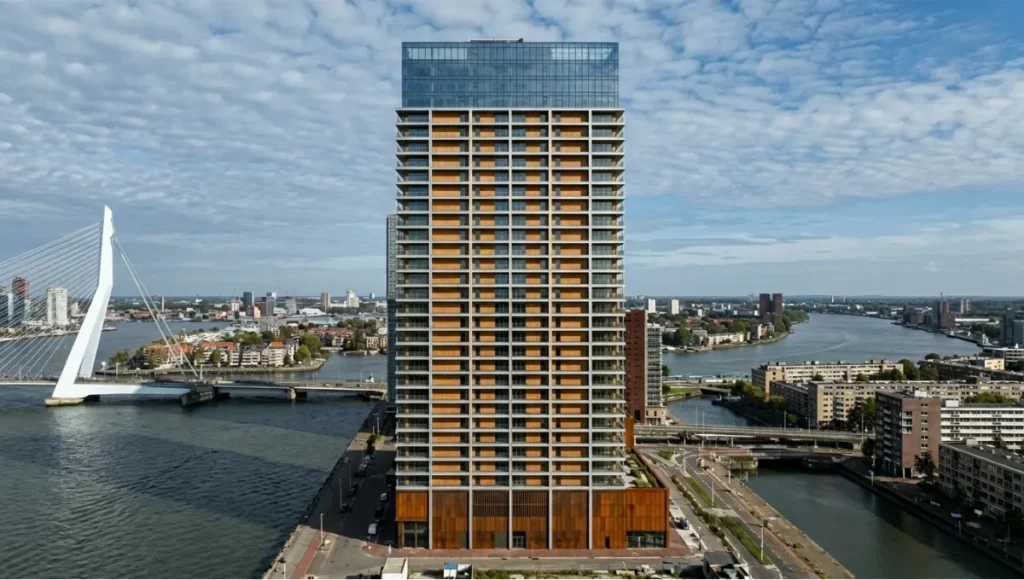
Concept Project Spotlight
Speculative / Internal Concept Study · Project Maas by Nuvira Space
Project Overview
- Location: Rotterdam Waterfront, Netherlands (Maas River, Het Park district)
- Typology: Mixed-use residential tower, 47 floors, hybrid timber-concrete structure
- Vision: A drone documentation study exploring how parametric facade geometry — specifically the building’s south-facing angled louvres — performs visually across four solar declination angles in a single shoot day, from 08:30 to 16:45 CET in October
Design Levers Applied
Flight Architecture
- 6 automated orbit passes at altitudes: 20 m / 45 m / 80 m / 120 m / 180 m / 240 m
- 3 manual passes targeting louvre shadow intervals at 09:15, 12:00, and 15:30 CET
- Litchi mission file pre-loaded from UE5 virtual fly-through waypoints
- Total flight time: 4.2 hours across 3 battery cycles
Sensor & Filter Configuration
- DJI Mavic 3 Pro — Hasselblad L-Format 4/3 sensor spec sheet, 24 mm equiv.
- Morning passes: ND16 + CPL — controlling Maas River surface specularity
- Midday passes: ND64 — suppressing facade hotspot on polished aluminium louvres
- Late afternoon: ND8 — maximising warm-tone saturation in weathering steel base
- All RAW DNG + JPEG reference; 128 GB CFexpress card
Post-Production Pipeline
- Lightroom: aerial colour temperature correction (+280K per altitude band)
- Luminance masking: sky vs. facade vs. river surface — three independent adjustment layers
- UE5 Lumen validation: shadow direction verified against physical captures ±3 minutes — see Epic Games UE5 Lumen documentation
- Final delivery: 16-bit TIFF ProPhoto + sRGB JPEG + 4K drone video edit
Transferable Takeaway
Project Maas demonstrates that a single building, documented with systematic flight architecture and material-specific sensor calibration, yields a complete visual library across one shoot day. The louvre shadow study — impossible to plan without solar simulation pre-flight — became the signature image series. Any photographer applying the pre-flight modelling protocol (Tip 1) to a building with strong directional geometry will replicate this outcome in their own market.
Intellectual Honesty: Hardware Check
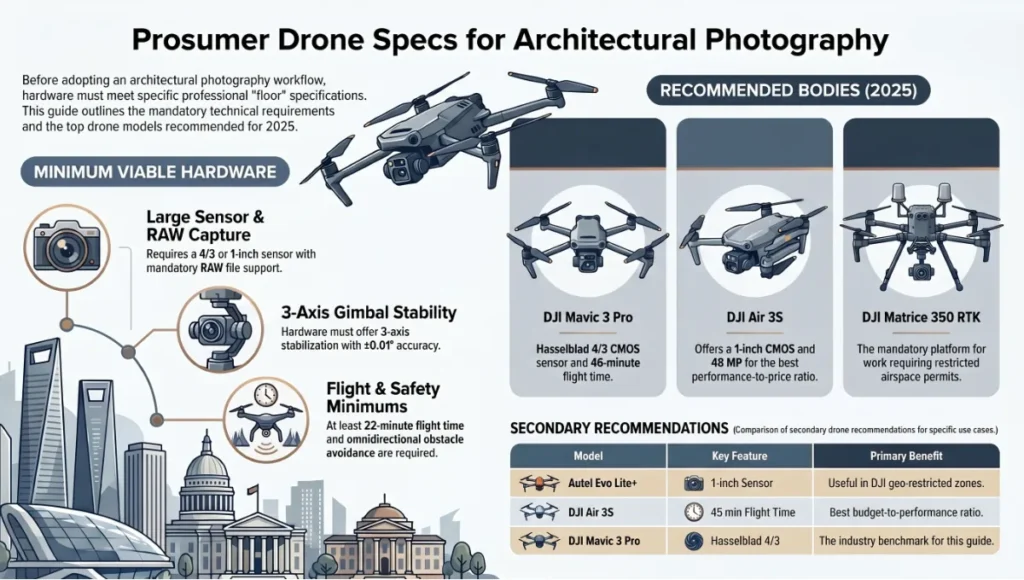
The nine drone architecture photography tips in this guide are calibrated to prosumer hardware. Before accepting any workflow, confirm your equipment meets the floor specifications below. Recommendations built on hardware assumptions that don’t match your kit produce workflow failures, not results.
Minimum Viable Hardware
- Sensor: 4/3 or larger (1-inch minimum for low-light facade work)
- Gimbal: 3-axis stabilised, ±0.01° accuracy
- RAW capture: mandatory — JPEG-only drones are disqualified from this workflow
- Flight time: 22 minutes minimum per battery under 15 km/h wind conditions
- Obstacle avoidance: APAS 5.0 or equivalent omnidirectional
- Transmission: O3+ or equivalent; FHD 60fps live feed mandatory for real-time composition judgment
Recommended Bodies (2025)
- DJI Mavic 3 Pro — Hasselblad 4/3 CMOS · 20 MP · 46 min · APAS 5.0 — benchmark for this guide
- DJI Air 3S — 1-inch CMOS · 48 MP · 45 min · APAS 4.0 — best budget-to-performance ratio
- Autel Evo Lite+ — 1-inch · 20 MP · 40 min — useful in DJI geo-restricted zones
- DJI Matrice 350 RTK — enterprise platform mandatory for restricted airspace permit work
2030 Future Projection
The drone architecture photography tips that define professional practice in 2025 will be partially automated by 2030. The trajectory is clear across three technology vectors.
AI-Driven Composition Engines
Real-time neural composition assistants, already in prototype at DJI and Skydio, will analyse building geometry via onboard edge inference and propose optimal camera azimuth and gimbal angle within 4 seconds of hovering near a facade. This eliminates Tip 9 as a manual skill — but not the interpretive capacity to understand why the algorithm makes its suggestions. That remains human.
Autonomous Mission Generation from BIM
Direct BIM-to-flight-path pipelines are in active development at DroneDeploy and Propeller Aero. By 2030, uploading an IFC file will auto-generate a certified mission plan with altitude profiles, camera settings, and regulatory compliance checks integrated. Pre-flight modelling (Tip 1) becomes a background service rather than a manual workflow.
Sensor-Fusion Multi-Spectrum Capture
Hyperspectral and thermal sensors integrated into prosumer drone bodies (already appearing in Matrice 30T for inspection workflows) will enter architectural photography by 2027–2028. Facade material analysis, energy performance visualisation, and thermal bridge mapping will become standard deliverables alongside visible-spectrum imagery. The photographer who understands spectral reflectance now (Tip 2) will lead that transition.
What Will Not Change
Light direction, shadow geometry, material texture, and compositional logic are physics, not software. The nine tips in this guide that engage those fundamentals — golden hour timing, ND filter physics, compositional vector analysis — remain valid regardless of automation level. Technical literacy is the durable investment.
Secret Techniques: Advanced User Guide
These are not workflow augmentations. They are techniques that separate editorial-quality drone architecture photography from competent commercial work.
The Shadow Cast Mapping Pass
Execute one nadir pass specifically to document the shadow cast geometry of the building onto the ground plane. This image — almost never included in standard deliverables — is architecturally critical for facade shading design reviews and becomes a compelling editorial image when building shadow interacts with street grid or water. Timing: solar noon ±15 minutes. Altitude: 1.2–1.8× building height above grade.
The Pantograph Approach
Start your orbit at maximum legal altitude. On each subsequent pass, drop altitude by 20 m and close radius by 15 m — a geometric convergence on the facade that creates a set of images with consistent vanishing point relationships. When assembled as a layered sequence in post, the pantograph approach produces a natural scale progression that no single-altitude orbit can replicate.
The Reflection Geometry Shot
Glass curtain wall buildings in urban contexts reflect adjacent structures. Pre-calculate which adjacent buildings will appear in the facade reflection at your planned camera azimuth using the angle of incidence = angle of reflection principle. A facade that reflects Rotterdam’s Erasmus Bridge, Singapore’s Marina Bay skyline, or Copenhagen’s canal network in its glazing is an entirely different editorial subject than one photographed in isolation. Plan the reflection; do not discover it by accident.
Temporal Bracketing for HDR Merge
On high-contrast days when shadow-to-highlight range exceeds 8 stops, execute three passes at identical GPS coordinates — separated by 90-second intervals — at −1.3 EV, 0 EV, and +1.3 EV. Merge using Lightroom’s HDR merge tool (align + deghost medium). This is the aerial equivalent of multi-exposure architectural HDR, rarely discussed in drone-specific resources but standard practice in ground-level architectural photography.
The Interior-Exterior Balance Window
The most technically demanding drone architecture images show interior spaces through glazing — balancing interior artificial light luminance with exterior daylight. This balance window is narrow: typically 20–35 minutes after official sunset when interior luminance (200–500 lux office standard) matches exterior ambient (decreasing from 2000 to 50 lux through civil twilight). No ND filter. ISO 400–800. 1/30s. Tripod-equivalent gimbal lock.
Comprehensive Technical FAQ
Q: What is the best drone for architecture photography in 2025?
A: For the workflow described in this guide, the DJI Mavic 3 Pro is the benchmark. It carries a Hasselblad 4/3 CMOS sensor with dual native ISO (100 / 800), shoots 20 MP RAW DNG, and offers a 46-minute rated flight time. The tele lens option (70 mm equiv.) enables facade compression shots unavailable on single-lens platforms. If budget is the primary constraint, the DJI Air 3S (1-inch sensor, 48 MP, 45-minute flight time) performs within 15% of the Mavic 3 Pro for single-facade work. Enterprise projects requiring documented telemetry for restricted airspace permits require the Matrice 350 RTK.
Key specs comparison
- DJI Mavic 3 Pro: 20 MP · 4/3 CMOS · f/2.8–f/11 · 46 min flight · APAS 5.0
- DJI Air 3S: 48 MP · 1-inch CMOS · f/1.7–f/11 · 45 min flight · APAS 4.0
- Autel Evo Lite+: 20 MP · 1-inch · f/2.8–f/11 · 40 min flight · Omnisense 360°
Q: Do I need a Part 107 licence (or EASA equivalent) for architectural drone photography?
A: Yes, for any commercial architectural photography work. In the United States, the FAA Part 107 Remote Pilot Certificate is required for all commercial drone operations. In Europe, EASA Open Category A2 competency is the minimum for most architectural shoots. Work near airports or crowds requires Specific Category STS-01 or higher. In Singapore, the CAAS Unmanned Aircraft Operator Permit covers commercial work but requires registration, insurance, and geo-zone approval per shoot location.
Q: How do I avoid propeller shadows in architectural shots?
A: Propeller shadow contamination in still images is almost exclusively a problem of shutter speed. At shutter speeds above 1/800s, propeller blades complete enough rotation during exposure to blur into invisibility. At 1/200s and below, partial propeller blur creates arc artefacts in high-contrast sky areas. Maintain shutter speed above 1/640s for any shot that includes significant sky area.
Anti-propeller shadow settings
- Minimum shutter for clean sky: 1/640s
- ND adjustment: stack up to keep shutter above floor in bright conditions
- Aperture: f/5.6–f/8 sweet spot for 4/3 sensor sharpness without diffraction
Q: What colour profile should I shoot for maximum post-production flexibility?
A: D-Log M (DJI) or equivalent flat colour profile at the time of capture, with a standard LUT applied in post as the correction baseline. This preserves the widest dynamic range (up to 12.8 stops on Mavic 3 Pro) and prevents irreversible highlight compression that occurs in Standard or Vivid colour profiles. The trade-off: flat profiles look unusable on the LCD preview — commit to trusting the histogram.
Q: How many images should I capture per building for a complete documentation set?
A: A complete single-building documentation set for architectural portfolio or planning use includes:
- 3–5 nadir overheads at varying altitudes
- 12–18 oblique orbit images (every 30° of azimuth × 2 altitude levels)
- 4–6 low lateral manual pass images (facade east, south, west, plus dominant corner)
- 2–3 detail close-up hovers (material transitions, entry sequence, crown detail)
- 1 interior-exterior balance shot at civil twilight (if glazed facade)
Total selects for client delivery: 25–40 images from a raw capture of 200–350 exposures.
Q: How should I handle wind conditions?
A: The usable wind ceiling for high-quality architectural drone photography is Beaufort Force 4 (sustained 21–29 km/h, gusting to 35 km/h). Above Force 4, gimbal stabilisation compensates for body movement but introduces micro-oscillation in long-exposure shots and compromises GPS hover accuracy by ±1.5 m — sufficient to shift composition between frames and prevent clean HDR merge alignment. Check sustained wind (not gusts) at planned flight altitude using UAV Forecast or Windy.com set to your exact altitude. Wind at 80 m AGL is often 40–60% stronger than surface conditions.
Elevate Your Aerial Workflow with Nuvira Space
The nine drone architecture photography tips documented in this guide are not aspirational — they are operational. Each one has a defined input (equipment spec, software tool, timing parameter), a defined process, and a measurable output difference in image quality or client deliverable completeness. The photographers and studios who implement all nine as a connected system — not as isolated tips — are the ones building the drone architecture portfolios that matter in 2025 and beyond.
At Nuvira Space, we publish the Visual Lab series precisely to close the gap between general photography advice and the technical rigour that professional architectural documentation demands. The AIA’s Architecture Resources Library provides complementary practice standards on architectural documentation methodology — a useful parallel reading for photographers working directly with architecture firms. If this guide shifted your workflow in a measurable direction, the next step is to apply the pre-flight modelling protocol (Tip 1) to your next commission and document the delta in reshoots avoided.
The best drone architecture photography is not captured in the air. It is designed on the ground, validated in a renderer, and executed with the confidence that comes from knowing — before the first motor spins — exactly what you are going to bring back.
© Nuvira Space · All rights reserved. | THE VISUAL LAB Series | All specifications cited are based on DJI Mavic 3 Pro technical documentation (2024), EASA UAS Regulation EU 2019/947, CAAS Singapore Unmanned Aircraft Act 2015 (revised 2022), FAA Part 107 Small UAS Rule (14 CFR Part 107), NOAA Solar Calculator data, Adobe Lightroom Classic technical documentation, Epic Games Unreal Engine 5 Lumen documentation, and Nuvira Space internal flight testing records 2023–2025.
Project Maas is a speculative internal concept study and does not represent a completed project.