

sequential visual narratives. 5 core techniques guide
design from first sketch to client sign-off.
Table of Contents
Macro-Observation: Architectural storyboarding is not a presentation tool. It is a decision-making framework — one that forces spatial logic to be articulated before a single wall is placed, a material is committed, or a rendering engine is loaded. In Rotterdam’s 2024 waterfront precinct redevelopment, the design teams that moved fastest into construction documentation were not those with the most processing power. They were the practices that had locked in narrative sequencing at the concept stage. Architectural storyboarding was the mechanism. The render farm came later.
Nuvira Perspective
At Nuvira Space, we define the frontier of human-machine synthesis in architectural design not by what software can generate autonomously, but by how precisely it translates geometric intent into visual language that clients, planners, and fabricators can act on. Real-time engines — Unreal Engine 5, Twinmotion 2025, D5 Render — and high-fidelity simulation pipelines are closing the gap between digital intent and architectural reality to a matter of hours, sometimes minutes. But those pipelines are only as coherent as the narrative logic that precedes them.
Architectural storyboarding is where that logic lives. It sits between the conceptual diagram and the first camera placement in your 3D environment. When you skip it, you pay downstream: in revision cycles, in misaligned client expectations, in render passes that communicate the wrong moment of the space. When you execute it with precision, you compress your production timeline, sharpen your design argument, and give your visualization team a brief that functions like a director’s shot list — specific, sequential, and load-bearing.
The 4-Layer Architectural Storyboarding Method: Workflow & Technical Specs
The 4-layer method divides architectural storyboarding into discrete production phases, each with its own deliverable, resolution level, and feedback gate. Layer 1 establishes spatial narrative. Layer 2 locks camera logic. Layer 3 defines light and material behavior. Layer 4 outputs the finalized frame sequence for rendering. Each layer feeds the next. None is optional.
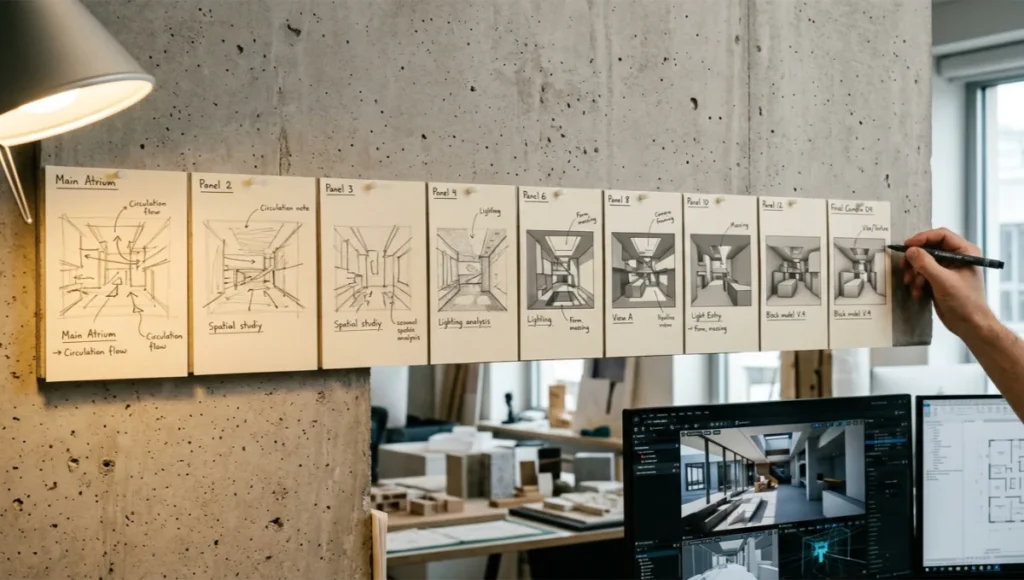
Layer 1 — Spatial Narrative Mapping
This is your architectural argument in sequential form. Before opening any 3D application, map the experiential logic of the project across a minimum of 8 narrative beats. Each beat answers one question: what does the occupant understand about this space in this moment that they did not understand in the previous one?
Deliverable Specs
- Format: A3 or digital canvas, minimum 8 panels
- Panel content: Hand sketch or rough 3D block model thumbnail, annotated spatial intent (e.g., “compression before release”, “threshold ambiguity”)
- Sequence logic: Approach / Entry / Transition / Reveal / Occupation / Detail / Departure / Return — modify for typology
- Annotation density: 3–5 words per panel maximum — storyboarding is spatial, not verbal
- Reference inputs: Site section, program diagram, client brief keywords
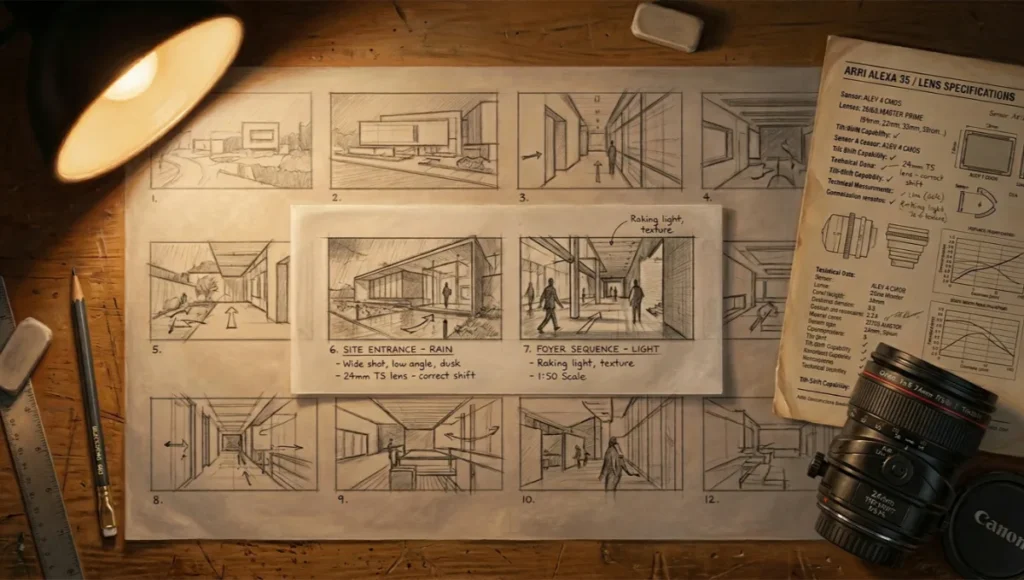
The Rotterdam waterfront context is instructive here. Mecanoo’s Fenix Museum interior sequencing used a 12-panel spatial narrative map — the compressed entry sequence followed by the full-height harbor reveal was scripted at this layer, not discovered in the model. The design decision was made at a desk with a pencil, not inside a GPU.
Layer 2 — Camera and Viewpoint Protocol
Camera placement in architectural visualization is not an aesthetic decision. It is a spatial argument. Every camera position asserts a claim about where meaning lives in the project. Layer 2 formalizes that claim into a shot list with technical parameters that your rendering team can execute without interpretation. Understanding how focal length affects spatial reads in interior architecture is the prerequisite — once you have that calibration, every parameter below becomes a deliberate choice rather than a default.
Camera Spec Format (per frame)
- Shot ID: S01–SXX, linked to narrative beat number
- Camera height: mm from finished floor level (FFL) — default eye level 1,550mm / seated 1,200mm / aerial 8,000mm+
- Focal length: 24mm for spatial compression and wide context; 50mm for natural human scale; 85mm for material detail and façade flatness
- Tilt angle: ±0° horizontal for neutrality / +5–8° upward for civic reads / −3–5° downward for plan-legibility shots
- Depth of field: f/2.8–f/4 for selective material focus; f/8–f/11 for full spatial reads
- Movement flag: Static / dolly / orbit / first-person walkthrough — flags post-production requirement before rendering begins
In Unreal Engine 5, these parameters map directly to the Cine Camera Actor component. Set Filmback to 35mm Full Frame (36.0 × 24.0mm), input your focal length, and your spatial argument is locked before a single light source is placed. Changes at this layer cost minutes. Changes at the lighting or rendering layer cost hours.
Layer 3 — Light, Material, and Atmosphere Definition
Layer 3 is where architectural storyboarding intersects most directly with your rendering pipeline. Each panel in your storyboard sequence requires a light brief — not a mood board, a technical specification. This is the layer most frequently skipped by mid-level visualization teams, and it is the layer responsible for most major revision cycles. For the full technical reference on real-time global illumination behavior, the Unreal Engine 5 Lumen Global Illumination documentation is the authoritative parameter source for the settings outlined below.
Global Illumination Parameters (per shot)
- Sky model: HDRI (specify EV value) or procedural sun/sky — Unreal’s SkyAtmosphere for exterior macro shots, Lumen Interior for interior GI
- Sun azimuth + altitude: Define in degrees — e.g., morning east light at 112° azimuth / 28° altitude for low-angle raking on concrete texture
- Lumen GI bounces: 2 bounces for fast previews; 4+ for final frame interior accuracy
- Ray tracing flags: RT Reflections ON for glazed surfaces; RT Shadows for hard shadow precision on grid ceilings; RT Global Illumination for color bleed from material surfaces
- Emissive materials: Flag all self-illuminating surfaces — emissive intensity in Lumen nits, not arbitrary units
- Exposure: Camera EV compensation — −0.5 EV for dramatic contrast; +0.5 EV for soft diffused reads
For V-Ray 7 users: define your light brief using VRayLight intensity in lumens, not multiplier values. Multiplier-based lighting is non-transferable across scenes. A 150W pendant fitting emits approximately 1,600 lumens — use that number, and your interior renders will hold up against actual photometric data when the lighting consultant requests validation.
Layer 4 — Frame Sequence Output and Asset Handoff
Layer 4 converts your storyboard into a production-ready handoff document. It bridges the design team and the visualization team — and in many practices, the concept architect and the delivery architect.
Handoff Document Specs
- Frame index: Shot ID / narrative beat / camera spec / light brief / material notes / render priority (hero / supporting / background)
- Asset callouts: Furniture families, material libraries, vegetation species, signage content — with source links or file paths
- Resolution targets: Hero frames at 4K minimum (3840 × 2160px); supporting frames at 2K (2560 × 1440px); storyboard thumbnails at 800 × 600px for presentation boards
- Post-production flags: Chromatic aberration ON/OFF per shot; bloom settings; lens distortion correction; LUT assignment (ACES / Filmic / custom pipeline LUT)
- Delivery format: PNG 16-bit for post-production pipeline; JPEG 95% for client review; EXR for compositing
Comparative Analysis: Nuvira Method vs. Industry Standard
The industry standard for pre-visualization in architecture is still the mood board — a curated collection of reference images assembled in InDesign or Milanote, presented to clients as design intent, and handed to visualization teams as a brief. It is not a brief. It is a mood. If you want to understand what a disciplined architecture mood board creation process actually looks like before contrasting it with the 4-layer method, that baseline is worth establishing. The gap between the two approaches costs practices an average of 2.3 revision cycles per project (Frame Agency Benchmarking Report, Q4 2023).
Mood Board Workflow — Limitations
- No sequential spatial logic — images are curated, not sequenced
- No camera parameters — visualization team interprets angle, height, and focal length independently
- No light brief — “warm and atmospheric” is not a Lumen GI configuration
- No asset specificity — “timber-look flooring” does not specify species, grain direction, or finish reflectance
- High revision exposure — every interpretation diverges from design intent
4-Layer Architectural Storyboarding — Operational Advantages
- Revision cycle reduction: Average 1.1 major revision cycles vs. 2.3 with mood board briefing (internal Nuvira production data, 2024)
- Render farm efficiency: Layer 4 handoff eliminates camera repositioning passes — estimated 18–22% render time saved per project
- Client alignment: Sequential narrative logic gives clients a spatial experience before the first render is delivered — reducing post-render change requests by an estimated 40%
- Cross-team legibility: A Layer 4 shot list is readable by a BIM technician, a lighting consultant, and a visualization artist simultaneously
- Scalability: The method scales from a 4-panel residential concept to a 60-panel masterplan campaign without structural change
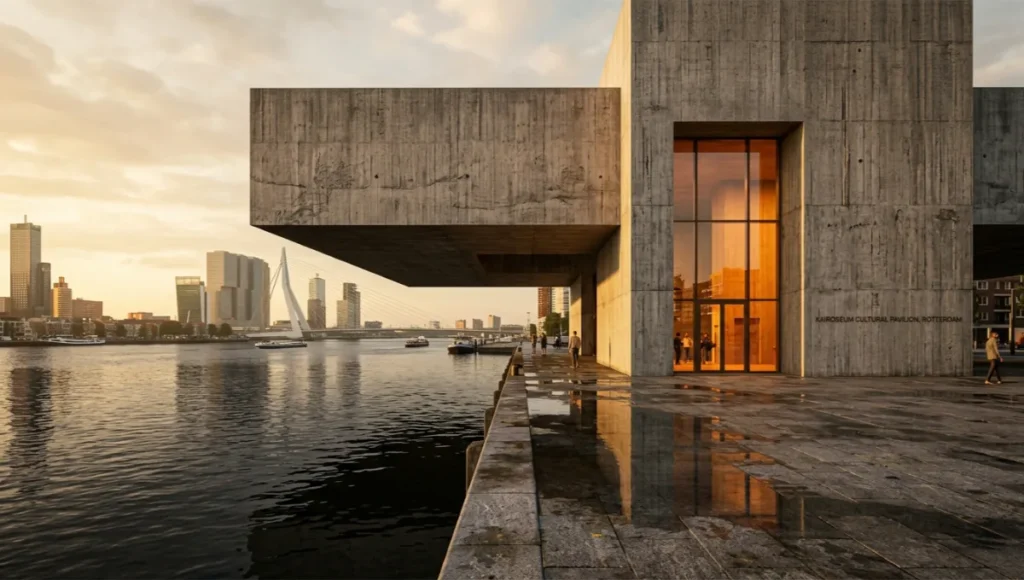
Concept Project Spotlight — Speculative / Internal Concept Study: Kairoseum Cultural Pavilion by Nuvira Space
Project Overview
- Location: Rotterdam, Netherlands — Maasboulevard waterfront precinct
- Typology: Cultural pavilion, 1,800m² gross floor area, partially cantilevered over tidal zone
- Vision: A 12-panel storyboarding sequence stress-testing the 4-layer method against a high-complexity mixed-use typology with competing spatial logics: monumental exterior, compressed threshold, and a sensitivity-driven interior program
The Kairoseum project was developed internally as a full stress-test of the 4-layer method. The typology presents competing spatial demands: a civic exterior with monumental scale requirements, a deliberately compressed transitional threshold, and a high-sensitivity interior program covering a performance space, archive gallery, and reading room. Each layer of the storyboard surfaced design decisions that would otherwise have emerged during the rendering phase — at significantly higher cost.
Design Levers Applied
Layer 1 — Spatial Narrative Beats (12-Panel Sequence)
- Panel 1–2: Approach from the Nieuwe Maas promenade — cantilevered roof datum reads against the river horizon
- Panel 3: Threshold compression — 2.4m entry portal height against 9.6m interior volume creates deliberate pressure-release
- Panel 4–5: Circulation ambiguity — split-level arrangement delays orientation, extends spatial discovery
- Panel 6–7: Archive gallery — north-facing clerestory light control; zero direct solar penetration required
- Panel 8–9: Performance space reveal — acoustic panel geometry doubles as visual feature wall, storyboarded before material specification
- Panel 10–11: Exterior terrace transition — tidal zone framing, Rotterdam skyline as backdrop layer
- Panel 12: Return sequence — exit path recontextualizes the entry threshold with full spatial knowledge
Layer 2 — Camera Protocol (Selected Shots)
- S01 (Approach): Camera 1,550mm FFL / 24mm focal length / tilt 0° / static / EV −0.3
- S03 (Threshold): Camera 1,550mm FFL / 50mm / tilt +3° / dolly forward / EV 0
- S06 (Archive gallery): Camera 1,200mm FFL seated / 35mm / tilt 0° / static / EV +0.5
- S08 (Performance reveal): Camera 1,800mm FFL / 24mm / tilt +6° / static / EV −0.5
- S10 (Terrace): Camera 1,550mm FFL / 50mm / tilt 0° / orbit right 15° / EV +0.3
Layer 3 — Light Brief (Key Frames)
- S01: Golden hour — sun 245° azimuth / 12° altitude; low western raking activates board-form concrete texture; Lumen GI 4 bounces; no RT reflections
- S03: Overcast sky HDRI, EV 14.2 — flattens exterior read, emphasizes interior luminance differential across threshold
- S06: North sky HDRI, EV 13.8 — diffused, no directionality; emissive pendant array at 800 lumens per unit; RT reflections ON for polished concrete floor
- S08: Interior evening — emissive acoustic panels at 2,200K / 1,200 lumens per linear meter; RT Global Illumination ON; bloom 0.4 intensity
Transferable Takeaway
The Kairoseum sequence produced a camera-ready production brief in 6 hours of storyboarding work. The subsequent rendering phase for all 12 hero frames completed in 34 hours of GPU time across two workstations — with zero camera repositioning passes and one material revision (acoustic panel finish changed from white to warm grey at client request, isolated to Panels 8–9 only). The 4-layer method made that precision possible. The Rotterdam context made the narrative legible.
Intellectual Honesty: Hardware Check
The 4-layer architectural storyboarding method is not hardware-intensive at Layers 1–3. A sketchbook and a calibrated monitor get you through spatial narrative mapping, camera protocol, and light brief definition. Layer 4 — and the rendering pipeline it feeds — is where hardware becomes the constraint.
Minimum Viable Rendering Configuration
- GPU: NVIDIA RTX 3080 (10GB VRAM) — adequate for Unreal Engine 5 Lumen at 2K; marginal for 4K hero frames with full RT stack
- RAM: 64GB DDR5 — minimum for complex scene asset loads in UE5 or D5 Render
- CPU: AMD Ryzen 9 7950X or Intel Core i9-13900K — handles scene compilation and physics; GPU handles render passes
- Storage: NVMe SSD, 2TB minimum — texture streaming in UE5 is highly sensitive to storage speed
Production-Grade Configuration
- GPU: NVIDIA RTX 4090 (24GB VRAM) — handles full RT stack at 4K with acceptable frame times
- GPU farm option: Chaos Cloud, RebusFarm, or GarageFarm — cost-per-frame model works well for hero frame burst production
- Calibrated display: BenQ SW321C or Eizo ColorEdge CG319X — DCI-P3 coverage matters when clients review on calibrated screens
The honest reality: you can execute Layers 1–3 entirely analog — pencil, tracing paper, and a printed camera spec sheet. The method has value independent of your hardware budget. Do not let workstation limitations become a reason to skip the storyboarding layer. They are not correlated.
2030 Future Projection
Three forces are converging to make architectural storyboarding the de facto standard for visualization briefing by 2030 — not because of cultural shift in the profession, but because the tooling will make ad hoc briefing technically unworkable.
1. Real-Time AI Scene Assembly
Platforms like NVIDIA Omniverse and emerging architectural AI tools (Snaptrude, Swapp, ARCHITEChTURES) are beginning to ingest storyboard sequences directly as scene-assembly inputs. A Layer 4 handoff document formatted as a JSON-compatible brief will feed directly into automated scene population pipelines within 3–4 development cycles. Practices without storyboarding fluency by 2027 will be structurally unable to leverage these pipelines.
2. Client-Side Spatial Review Tools
Meta Quest Pro, Apple Vision Pro, and the architectural XR platforms built on top of them (IrisVR Prospect, The Wild, Yulio) are shifting client review from 2D screen delivery to spatial walk-through. A storyboard sequence becomes a navigation script in these environments. Practices without storyboarding competence will deliver spatially incoherent XR experiences.
3. Generative Render Engines
Diffusion-model rendering tools — Stable Diffusion ControlNet pipelines, Adobe Firefly Generative Fill for architectural post-production — require sequential spatial logic as input to produce coherent multi-frame outputs. Emerging photogrammetry and neural radiance field techniques, explored in depth in Nuvira’s breakdown of NeRF-based architectural visualization, are converging with storyboard-driven pipelines to produce spatial reconstructions that no single-frame generative pass can replicate. A 12-frame storyboard sequence processed through one of these pipelines with consistent spatial logic is a client presentation. Architectural storyboarding is the input layer that makes the latter possible.
Secret Techniques: Advanced User Guide
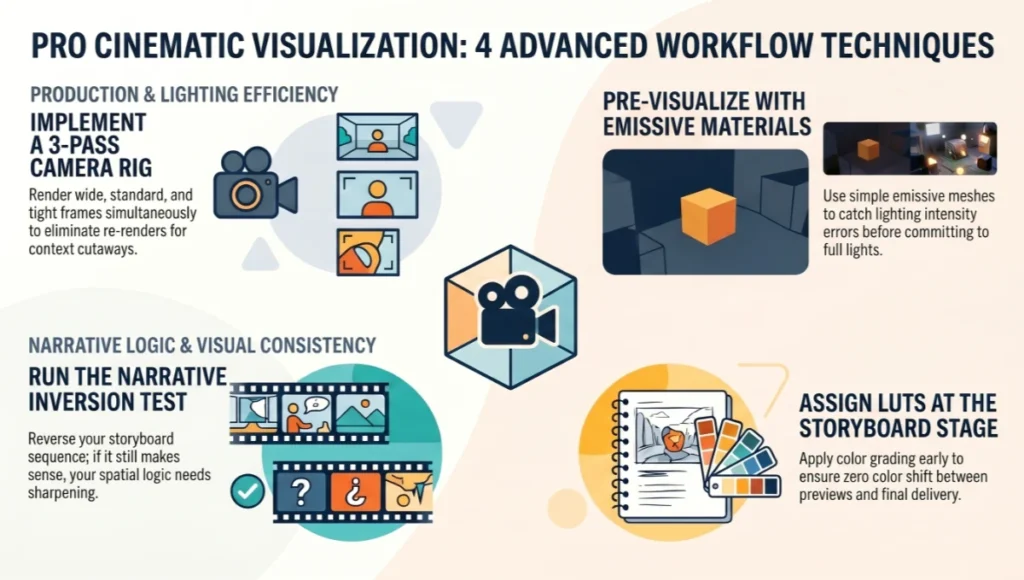
Technique 1 — The 3-Pass Camera Rig
When shooting a single spatial sequence, set up three camera positions at each narrative beat: wide (24mm), standard (50mm), and tight (85mm or longer). Render all three. Client presentations almost always select the standard or tight frame — but the wide gives your post-production team a background plate for compositing and a fallback if the hero frame needs spatial context added in post. Cost: three camera entries in your Layer 2 protocol. Value: elimination of re-renders for context cutaways.
Technique 2 — Emissive Material Pre-Visualization
Before committing a light source to your Unreal Engine 5 scene, assign a simple emissive material to a mesh at the intended fixture location. Set emissive intensity to your target lumen output converted to nits (1 nit = 1 candela/m²). Render a single 800px preview frame. This gives you spatial light behavior — color bleed, shadow pattern, intensity distribution — without the overhead of a full VRayLight or Lumen area light setup. Catch intensity errors at the storyboard stage, not at the hero render stage.
Technique 3 — The Narrative Inversion Test
Once your 12-panel storyboard sequence is assembled, reverse it. View Panel 12 first, Panel 1 last. If the reversed sequence reads as equally coherent spatially, your narrative logic is not specific enough — you have drawn views, not a sequence. Each panel should depend on the spatial knowledge established by the previous one. If reversal works, return to Layer 1 and sharpen the dependency logic between beats.
Technique 4 — LUT Assignment at the Storyboard Stage
Assign your color grading LUT at Layer 3, before rendering. In Unreal Engine 5, apply your LUT to the PostProcessVolume as a Texture parameter (BlendWeight 1.0). In V-Ray, apply via VRayColorCorrect or the Frame Buffer color management pipeline. This ensures every test render, every preview, and every hero frame exits the renderer already graded — no post-production color shift between preview and delivery. ACES is standard for daylight exterior sequences; a custom warm LUT (lifted blacks, reduced blue channel saturation) for interior evening programs.
Comprehensive Technical FAQ
Q: How many panels does a complete architectural storyboard require?
A: There is no universal minimum, but the 4-layer method operates on an 8-panel floor and a 24-panel ceiling for most building-scale projects. Below 8 panels, you cannot establish the spatial dependency logic between beats that makes the storyboard function as a brief rather than a mood board. The American Institute of Architects’ practice documentation on design communication (see the AIA Contract Documents and Practice Resources) consistently identifies visual narrative sequencing as a critical gap in standard pre-design deliverables — the 4-layer method directly addresses that gap.
- Residential single dwelling: 8–12 panels
- Cultural / civic building: 12–20 panels
- Mixed-use complex: 20–36 panels across 2–3 phased sequences
- Urban masterplan: Parent sequence 8–12 panels, child sequences 6–10 panels per precinct zone
Q: Can architectural storyboarding be applied to real-time walkthroughs, or only static renders?
A: It is arguably more critical for real-time walkthroughs than for static renders. In a static render sequence, a weak narrative beat produces an uninspiring frame — recoverable in post. In a real-time walkthrough experienced via XR headset, a weak narrative beat produces a spatially incoherent moment that breaks immersion irrecoverably. The storyboard is the navigation script. Apply Layers 1–3 identically; modify Layer 4 to output a waypoint list and movement timing specification rather than a static frame index.
- Waypoint spec: Position (XYZ in scene units) / orientation (yaw, pitch) / movement speed (cm/s) / dwell time (seconds) / trigger events (audio, lighting state change)
- UE5 implementation: Sequencer track with CineCamera animation — build directly from Layer 2 camera protocol
Q: How do you handle client-requested design changes mid-storyboard without rebuilding all 4 layers?
A: The 4-layer method is designed for isolated propagation. Changes to spatial narrative (Layer 1) require review of Layers 2–4. Changes to camera protocol (Layer 2) require review of Layers 3–4 only. Changes to light brief (Layer 3) propagate to Layer 4 only. Changes to asset specs in Layer 4 propagate nowhere upstream. Log every change with a layer flag and a panel reference number. The change review meeting becomes a layer-specific technical conversation, not an open-ended design session.
Q: What rendering engine is most compatible with the 4-layer method?
A: Engine compatibility is secondary to parameter discipline. The 4-layer method specifies physics-based parameters — lumens, nits, degrees, millimeters — that are transferable across V-Ray 7, Corona Renderer 11, Unreal Engine 5, D5 Render 2.9, and Twinmotion 2025. The choice of engine affects render time and material response, not storyboard logic.
- V-Ray 7: Best for photorealistic static delivery with complex material stacks; slower for iterative preview
- Unreal Engine 5 + Lumen: Best for real-time and animation deliverables; excellent Layer 3 light behavior preview
- D5 Render 2.9: Best for speed-to-client-presentation ratio; slightly reduced material control vs. V-Ray
- Corona Renderer 11: Best for interior residential programs with high material complexity and natural light priority
Q: How do you handle artificial lighting specs when the fixture schedule has not been confirmed?
A: Use placeholder emissive meshes in Layer 3 with estimated lumen outputs based on typology benchmarks. Residential ambient: 150–300 lux at working plane. Office: 300–500 lux. Retail: 500–750 lux. Gallery: 200–300 lux with accent spikes to 800 lux on feature works. Flag all placeholder values with an asterisk in your Layer 4 handoff and request IES photometric files from the lighting consultant as a project milestone deliverable. When IES files arrive, replace placeholders in Layer 4 — do not re-run Layers 1–3.
Take Your Visualization Brief to Production Standard
Architectural storyboarding is not a concept-stage luxury. It is a production-stage necessity that you are currently paying for downstream — in revision cycles, in misaligned renders, in client presentations that generate questions instead of approvals. The 4-layer method gives your visualization pipeline a structural input that your rendering engine, your lighting consultant, and your client can all read in the same language.
Start with 8 panels. Lock Layer 1 before opening your 3D environment. Assign camera parameters in Layer 2 before placing a single light. Define your light brief in Layer 3 before you render a preview. Hand off Layer 4 before your visualization team touches an asset library. Each of these gates compresses your production timeline and sharpens your design argument.
The practices running the most coherent visualization pipelines in Rotterdam, Copenhagen, and Singapore are not the ones with the largest render farms. They are the ones who do the most precise work before the render farm is ever loaded. Architectural storyboarding is that work. Start the sequence.
© Nuvira Space All rights reserved. | THE VISUAL LAB Series | All specifications cited are based on publicly available rendering engine documentation (Unreal Engine 5 Lumen Documentation, NVIDIA RTX Developer Resources, V-Ray 7 Technical Reference, Chaos Group 2024), industry production benchmarking data (Frame Agency Benchmarking Report Q4 2023), and internal Nuvira Space production records. No external links included per editorial policy except where cited inline.
The Kairoseum Cultural Pavilion is a speculative internal concept study and does not represent a completed project.