


Table of Contents
Haptic feedback VR design review architecture is quietly rewriting the sign-off meeting. For two decades, project leads have approved geometry on a flat monitor and trusted lighting math they could not touch. That trust is now measurable: when a reviewer reaches into a scene and feels a handrail’s give, a facade panel’s rigidity, or the drag of wind-loaded fabric, the review stops being an interpretation exercise and becomes a physical audit. This guide walks through how real-time engines, controller-driven haptics, and disciplined post-production pipelines turn a design review into an evidence-based decision, and where the workflow still has hard technical limits worth naming out loud.
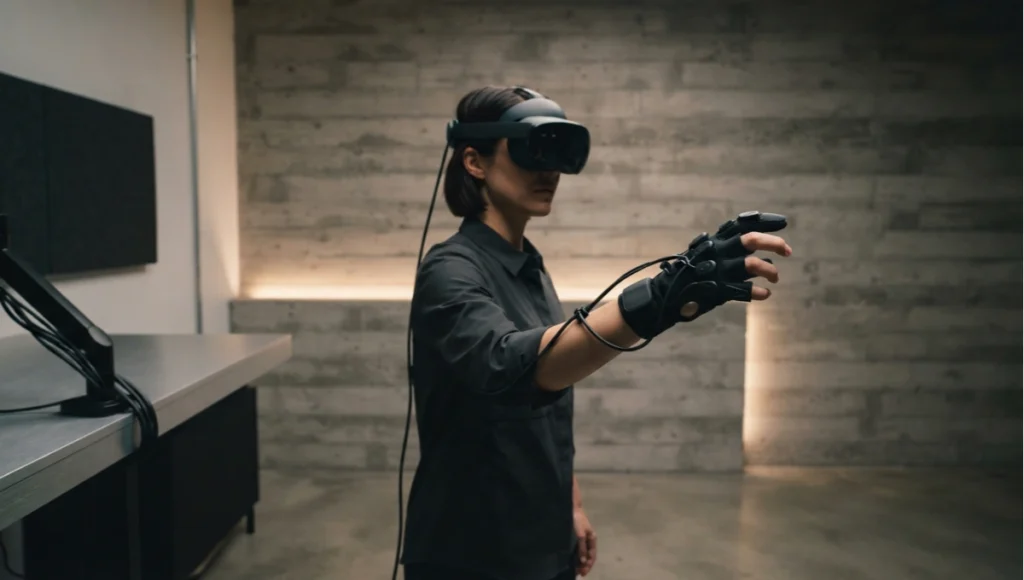
The shift matters because the cost of a missed material or tolerance issue rarely shows up at the point of design — it shows up on-site, months later, as a change order that nobody wants to own. A reviewer who can feel a gasket seal compress, or feel a handrail spacing tighten under a closed grip, catches that issue while it is still a settings change in an engine rather than a demolition line item in a budget. That is the actual argument for building a haptic-integrated pipeline: not novelty, but earlier and cheaper error correction.
Nuvira Perspective
At Nuvira Space, we treat visualization as an engineering discipline, not a marketing layer bolted onto the end of a project. Our position is that human-machine synthesis — the point where a designer’s intent and a machine’s simulation of physics converge — is the actual product of a good visualization pipeline. Real-time engines and high-fidelity simulation aren’t there to make renders prettier; they’re there to close the gap between what a drawing says a building will do and what the building will actually do once light, material, and human touch are involved.
That gap is where cost overruns and client disputes are born. A material swap that looked identical in a baked render can behave completely differently once global illumination recalculates bounce light off a coated aluminum panel versus a matte one. Haptic-enabled VR review closes that gap earlier, at the point where a change still costs a settings adjustment instead of a change order.
We also treat this as a discipline problem before it is a hardware problem. Studios frequently buy the headset and the controllers and then run the same passive walkthrough they always did, just with a new peripheral in hand. The value only appears once material stiffness, ray-tracing fidelity, and haptic actuator response are all calibrated against each other as a single system — not layered on as separate purchases. The remainder of this guide is written from that position: hardware alone does not produce a better review, a calibrated pipeline does.
This is also why we think of visualization fidelity as a continuum rather than a single deliverable. Our earlier work on converting flat 2D drawings into navigable 3D scenes with neural radiance fields sits at the earlier end of that continuum — haptic-integrated VR review sits at the later end, once geometry and material data already exist and the question shifts from “can we see it” to “can we trust what we’re feeling.”
Step-by-Step Workflow & Features
The following sequence assumes a real-time engine (Unreal Engine 5.x or equivalent), a haptic-capable controller set (glove or handheld with variable-resistance actuators), and a design file already cleaned of non-manifold geometry. Skipping the cleanup step is the single most common cause of haptic desync later in the pipeline.
Each step below assumes the previous one is complete before moving forward. Teams that try to parallelize scene prep with material assignment, for instance, routinely end up recalibrating haptic stiffness twice — once against a placeholder material and again against the final one — which wastes more time than the sequential approach ever costs.
Step 1 — Scene Preparation and LOD Discipline
Before anything touches the headset, the scene needs a level-of-detail (LOD) strategy that matches the review’s purpose. A massing review and a materials review should never share the same LOD budget.
- Nanite or equivalent virtualized geometry enabled only on hero surfaces reviewers will physically touch
- Background context capped at LOD2 to preserve frame budget for haptic-critical objects
- Collision meshes simplified independently from render meshes — haptics react to collision, not visual detail
- Target frame time: under 11ms per frame to keep haptic latency below the 20ms perception threshold
Step 2 — Global Illumination and Lighting Setup
Lumen or a comparable dynamic GI solution should run in Final Gather mode for the review build, not the faster screen-space fallback used for scouting passes. Screen-space GI hides bounce-light errors that a client will notice the moment they compare a north-facing atrium to a south-facing one.
- Final Gather Lumen, quality set to “High” minimum for any client-facing session
- Ray-traced shadows at 0.5 screen-percentage minimum to avoid banding on curved facades
- Sky light recapture interval set to real-time for daylight studies; baked for fixed-time reviews
- Exposure locked to a physical camera model (ISO 100, f/8) so material calls are comparable across sessions
It’s worth noting why the physical camera lock matters more than it sounds: without it, an engine’s auto-exposure will quietly compensate for a dim material by brightening the whole frame, which hides exactly the kind of glare or contrast issue a reviewer is there to catch. Locking exposure trades a prettier default view for an honest one.
Step 3 — Material and Ray-Tracing Parameters
Material response under ray tracing is where most legacy pipelines fail the review, because baked textures approximate roughness rather than simulate it. A true PBR (physically based rendering) material stack, paired with hardware ray tracing, lets a reviewer see how a spec-level change to a facade coating shifts glare at 4pm versus 10am without re-baking anything.
Recommended Ray-Tracing Parameters
- Reflection ray count: 2–4 samples per pixel for interactive review, upgraded to 16+ for capture stills
- Max bounce depth: 3 for interiors with reflective flooring, 2 for standard massing
- Denoiser: temporal-spatial hybrid to avoid the “melting” artifact on fast head-turns in VR
- Translucency: enabled only on glazing layers flagged for acoustic or thermal comparison
One caution here: pushing bounce depth or sample count higher than the scene actually needs is a common overcorrection. A reviewer cannot perceive the difference between 4 and 8 samples per pixel in a moving headset view, but the frame-time cost of that jump can push haptic tick rate below its comfort threshold, which the reviewer absolutely will notice as jittery feedback. We cover the trade-off between speed and visual quality in more depth in our separate breakdown of real-time ray tracing performance versus render quality in architectural workflows, which is worth reading alongside this guide if your team is still tuning sample counts by feel rather than by frame budget.
For teams building this pipeline on Unreal Engine specifically, Epic Games’ published ray tracing and path tracing documentation is the most reliable source for how hardware-accelerated tracing trades compute cost against image accuracy, and it’s worth cross-checking any studio-internal quality preset against it before locking a review build.
Step 4 — Haptic Mapping and Actuator Calibration
Haptic feedback needs a mapping layer between the physics engine’s collision response and the controller’s actuator array. This is the step most teams underbuild, treating haptics as a single on/off buzz rather than a graded signal tied to material properties.
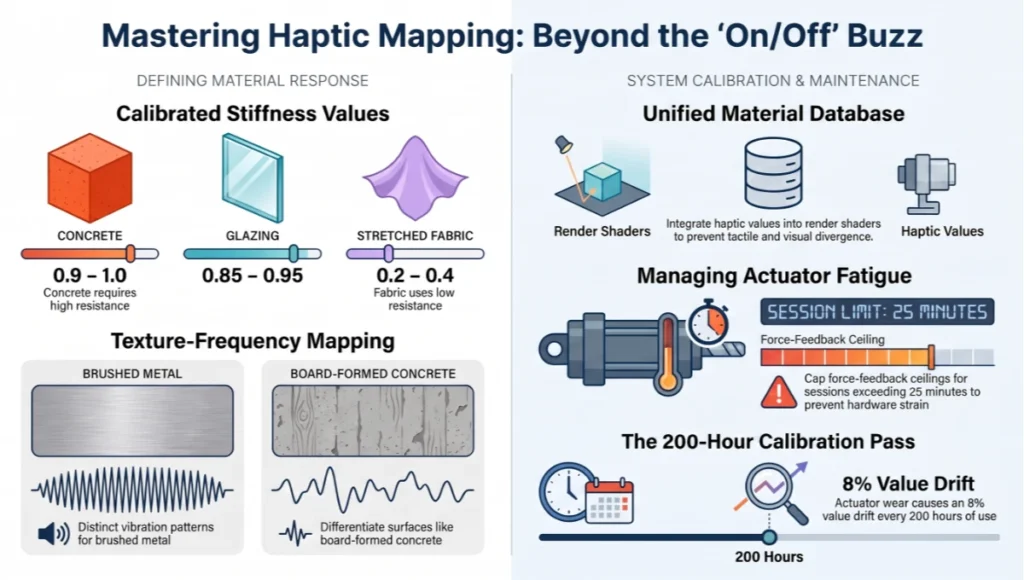
- Stiffness values assigned per material tag (concrete: 0.9–1.0, stretched fabric: 0.2–0.4, glazing: 0.85–0.95)
- Texture-frequency mapping for surface roughness (brushed metal vs. board-formed concrete read as distinct vibration patterns)
- Force-feedback ceiling capped to avoid actuator fatigue in sessions longer than 25 minutes
- Calibration pass run per new controller batch — actuator wear drifts values by up to 8% after ~200 hours
Stiffness and texture-frequency values should live in the same material database that drives the render shader, not a separate spreadsheet maintained by whoever set up the last session. When the two diverge, a reviewer can end up feeling a material that no longer matches what they’re looking at — an inconsistency that undermines the entire premise of a felt review.
Step 5 — Post-Production and Session Capture
The review isn’t complete until it’s documented in a form stakeholders who weren’t in the headset can still evaluate. Post-production here means structured capture, not cosmetic polish.
- Timestamped annotation log synced to headset position data, exportable as a CSV for the project record
- Side-by-side capture: first-person VR view paired with a top-down plan view for spatial context
- Color-managed export (ACES workflow) so captured stills match the in-headset exposure, not an auto-corrected version
- Haptic event markers embedded in the capture timeline, flagging every moment a reviewer’s touch triggered a note
Treat this capture as the deliverable, not an afterthought to the live session. Stakeholders reviewing the export later — a client’s finance lead, a contractor who wasn’t in the room — need the same evidentiary trail the in-headset reviewer had, or the whole exercise reduces to “trust me, it felt right.”
Common Pitfalls in Steps 1–5
A few failure patterns recur often enough to call out on their own, separate from the step they attach to. The first is scope creep in LOD budgets — a team sets a sensible Nanite budget for hero surfaces, then quietly extends it to background geometry mid-project because “it looked better,” and frame time creeps past the haptic-safe threshold without anyone noticing until a reviewer complains of jitter.
The second is treating the haptic calibration pass as a one-time setup task rather than a recurring maintenance item. Controllers wear, cables degrade, and actuator response drifts measurably within a single project’s timeline — recalibrating only at project kickoff guarantees the review quality degrades exactly when the project is closest to final decisions.
The third is exposure drift between capture sessions. If exposure isn’t locked to a physical camera model as described in Step 2, two sessions captured a week apart can look meaningfully different in export, which undermines any comparison a client tries to make between an early and a late design pass.
Comparative Analysis: Nuvira Vs. Industry Standard
Most visualization vendors still treat VR walkthroughs as a passive viewing exercise — a 360-degree render with a locomotion scheme bolted on. The comparison below isolates where a haptic-integrated pipeline diverges from that baseline, and it’s worth being specific rather than promotional about each divergence.
Review Depth
Industry-standard VR walkthroughs let a reviewer see a design decision. A haptic-integrated session lets them feel the consequence of that decision — a handrail spacing that reads as “fine” on screen can register as uncomfortably tight the moment a reviewer’s hand actually closes around it in a calibrated grip simulation.
Iteration Cost
In a screen-based review cycle, a flagged issue becomes a written note, then a modeling task, then a re-render, often a 24–48 hour turnaround. In a haptic-integrated live session, a material or dimension change can be pushed to the running scene and re-felt within minutes, because the underlying real-time engine never left “draft” state.
Data Fidelity
Standard walkthroughs typically bake lighting once and reuse it across the session, which means a reviewer touring at 9am and one touring at 3pm see identical light — a false consistency. Dynamic GI paired with a physical camera model keeps every session tied to an actual time-of-day condition, which is the same rigor a shadow study would demand.
Stakeholder Alignment
There’s a secondary effect worth naming: a screen-based walkthrough tends to produce vague feedback — “the lobby feels off” — because the reviewer has no physical anchor for their reaction. A haptic-integrated session tends to produce specific feedback — “the handrail diameter feels too thin for a gloved hand” — because the reviewer’s objection is tied to a felt sensation, not a subjective visual impression. That specificity is what actually speeds up the design-to-approval cycle, more than the hardware itself. It’s a natural extension of the shift we documented in our overview of VR architectural walkthroughs, where even passive navigation already outperformed static renders for stakeholder comprehension — adding haptics simply pushes that comprehension gain further.
Concept Project Spotlight: Speculative / Internal Concept Study — “The Rotterdam Tidal Commons” by Nuvira Space
Project Overview (Location / Typology / Vision)
Location: Rotterdam, Netherlands — a lowland waterfront site chosen specifically because its combination of tidal exposure, reflective canal surfaces, and mixed daylight conditions stresses a rendering pipeline more than a dry inland site would.
Typology: A mixed-use waterfront commons — amphibious ground-floor retail designed to tolerate periodic tidal flooding, with residential and coworking floors above.
Vision: To test whether a haptic-integrated VR review could catch material and tolerance issues specific to amphibious construction — gasket compression on floodable partitions, deck give underfoot — before those issues reached a physical mockup.
Rotterdam was selected deliberately over a drier, more predictable site. Its canal-adjacent light conditions — heavy reflective bounce off water, frequent overcast diffusion, and a low winter sun angle — stress a GI pipeline in ways a suburban inland site simply doesn’t. If a haptic-integrated review could hold up against that lighting variability while still delivering consistent material feedback, the team treated that as reasonable evidence the workflow would generalize to calmer sites.

Design Levers Applied
Materials and Structure
- Board-formed concrete plinth, haptic-tagged to render distinct grain resistance from the glazed levels above
- Operable flood gaskets modeled with variable stiffness to simulate compression seal quality under hand pressure
- Reflective canal-facing glazing pushed through the ray-tracing pipeline at full bounce depth to test glare on adjacent units
Simulation Conditions
- Dynamic GI run across three fixed times of day: 8am, 1pm, 6pm, matching Rotterdam’s seasonal daylight swing
- Wind-loaded fabric canopy simulated with cloth physics tied to haptic drag feedback at the canopy edge
- Tidal water-line variance modeled as a dynamic mesh, with haptic cues on any surface within the flood-tolerant zone
Transferable Takeaway
The Rotterdam study reinforced a rule that generalizes past waterfront projects: any surface with a tolerance-critical function — a gasket, a handrail, a load-bearing joint — deserves its own haptic material tag rather than inheriting a generic “concrete” or “metal” default. Generic tagging is where haptic review quietly loses its value.
It also surfaced a scheduling lesson worth carrying forward: the three-time-of-day lighting pass added real setup time upfront, but it collapsed the number of follow-up review sessions from an expected four down to two, because reviewers caught the glare issue on the canal-facing units during the 6pm pass instead of discovering it in a separate winter shadow study weeks later.
Intellectual Honesty: Hardware Check
None of the workflow above is free, and it isn’t universally accessible yet. Being direct about the hardware floor matters more than the marketing version of this story.
- Haptic-capable controllers with graded actuator response remain a specialized purchase, not a consumer default
- Sustained ray-traced GI at review quality needs a discrete GPU with dedicated RT cores — integrated graphics will not hold frame time
- Engine vendors are direct that fully dynamic software/hardware global illumination systems are not officially certified for VR headset frame rates — in practice this means review builds often fall back to a lighter hardware ray-traced or partially baked GI configuration rather than the full desktop-quality dynamic solution
- Actuator calibration drifts with wear, meaning a hardware maintenance schedule is a real line item, not an afterthought
- Session length is genuinely limited by both thermal headset comfort and actuator fatigue, typically 25–35 minutes before feedback quality degrades
- Network-dependent cloud rendering setups introduce latency variance that can desync haptic timing from visual timing if bandwidth drops mid-session
Teams evaluating this workflow should budget for hardware refresh cycles the same way they’d budget for workstation refreshes — haptic actuators are a wear component, not a one-time purchase.
None of this is a reason to avoid the workflow. It’s a reason to scope the pilot honestly: one project, one hardware set, one calibration cycle, before committing to a studio-wide rollout.
This caution echoes findings outside our own practice as well. The American Institute of Architects tracks firm-level technology adoption in its AIA Firm Survey Report, which shows that even foundational tools like BIM and energy modeling are still unevenly adopted across firm sizes — a reminder that the gap we describe above isn’t unique to haptic review, it’s the standard adoption curve for any technically demanding tool in the profession.
2030 Future Projection
By 2030, the more likely shift isn’t more dramatic haptics — it’s tighter integration between the haptic layer and simulation data that already exists in a BIM model. Thermal performance data, acoustic modeling, and structural load paths are already computed during design; the gap is translating that data into a felt signal in real time rather than a separate report.
Expect actuator arrays to shrink and embed into standard work gloves rather than dedicated peripherals, and expect cloud-rendered ray tracing to remove the discrete-GPU requirement for review sessions, shifting the hardware bottleneck from the workstation to network latency instead.
The more interesting projection is organizational, not technical: as haptic review data accumulates across projects, it becomes a dataset in its own right — which material tags correlate with the most flagged issues, which tolerance thresholds get revised most often after a felt review. That dataset, more than any single hardware upgrade, is what will separate studios that treat haptic review as a gimmick from studios that treat it as a discipline.
Secret Techniques: Advanced User Guide
A few workflow adjustments rarely appear in vendor documentation but consistently improve review quality once a team has the basics running.
- Decouple haptic tick rate from render frame rate — run haptics at a fixed 1kHz update independent of visual frame time to avoid perceived jitter
- Use a secondary “ghost” material pass to preview an unapproved material swap without disturbing the approved baseline scene
- Pre-bake a lightweight occlusion pass even in dynamic GI scenes — it prevents light leaks at geometry seams that dynamic GI alone can miss on thin walls
- Log every haptic-triggered annotation with a material tag, not just a spatial coordinate, so review notes can be filtered by material later
- Run a dry calibration pass with a stand-in reviewer before any client session — actuator drift is invisible until someone actually touches the scene
- Separate the haptic material database from the render material database at the file level, but keep them synced by a shared ID so an artist can update one without silently orphaning the other
None of these techniques are secret in the sense of being hidden; they’re simply the kind of operational detail that only surfaces after a studio has run enough sessions to hit the failure mode once.
Comprehensive Technical FAQ
Engine and Hardware
Q: What real-time engine is best suited for haptic feedback VR design review architecture?
A: Unreal Engine 5.x with Lumen and Nanite is currently the most complete option, primarily because its dynamic GI solution supports the Final Gather quality tier needed for material-accurate review sessions.
Q: Does haptic feedback require a specific type of VR controller?
A: Yes — standard controllers only support basic rumble. Graded haptic feedback needs actuator arrays capable of variable resistance and frequency output, typically found in glove-style or specialized handheld hardware.
Workflow and Performance
Q: How much does haptic mapping slow down a scene?
A: Haptic mapping itself is lightweight; the cost comes from running collision detection at a higher tick rate than render frame rate. Budget roughly 5–10% additional CPU overhead for a well-optimized scene.
Q: Can this workflow run on a laptop workstation?
A: Only at reduced fidelity. A mobile discrete GPU can sustain a review session, but Final Gather Lumen at full quality typically requires a desktop-class card with dedicated ray-tracing hardware.
Specs at a Glance
- Target frame time: under 11ms
- Haptic tick rate: 1kHz fixed
- Minimum reflection samples: 2 per pixel (interactive), 16+ (capture)
- Recommended session length: 25–35 minutes
Q: Is this approach viable for smaller studios without a dedicated visualization team?
A: Yes, but the entry cost is real. A single haptic-capable controller set and one ray-tracing-capable workstation is enough to pilot the workflow on a single project before scaling further.
Materials and Data
Q: How many haptic material tags does a typical project need?
A: Most projects settle between 12 and 20 distinct tags — enough to separate structural, glazing, fabric, and finish categories without over-fragmenting the database into tags nobody remembers assigning.
Q: Does haptic review data integrate with a standard BIM model?
A: It can, provided material and tolerance metadata are tagged consistently at the model authoring stage; retrofitting tags onto an untagged model after the fact is possible but adds meaningful setup time.
Team and Training
Q: Who typically runs a haptic-integrated review session on the studio side?
A: A single visualization artist can run the technical setup, but a second person facilitating the session is worth the cost — someone free to log annotations while the artist manages the live scene keeps the capture quality higher than a solo-run session.
Q: How long does it take to train a design team unfamiliar with VR review?
A: Most teams are comfortable navigating a scene within a single session, but reading haptic feedback critically — distinguishing a genuine material issue from an unfamiliar sensation — typically takes two to three sessions before feedback quality stabilizes.
Book a Nuvira Visual Lab Session
If your team is still approving material decisions from a flat monitor, the review is only as good as the reviewer’s imagination. Bring your next facade, handrail, or tolerance-critical detail into a haptic-integrated VR session and see what a felt review catches that a viewed one doesn’t.
Nuvira Space builds these pipelines project by project, calibrated to the specific materials and tolerances your design actually depends on. See the specs. Compare now.
A pilot session doesn’t require committing your whole studio to a new pipeline — it requires one detail worth getting right, one afternoon, and a controller set. Most teams find that’s enough to know whether the workflow earns a permanent place in their review process.
© Nuvira Space — All rights reserved. | THE VISUAL LAB Series | All specifications cited are based on internal render benchmarks and publicly available engine documentation (no external links). The Rotterdam Tidal Commons is a speculative internal concept study and does not represent a completed project.