

Table of Contents
Macro-Observation: The Render Is Now the Design Argument
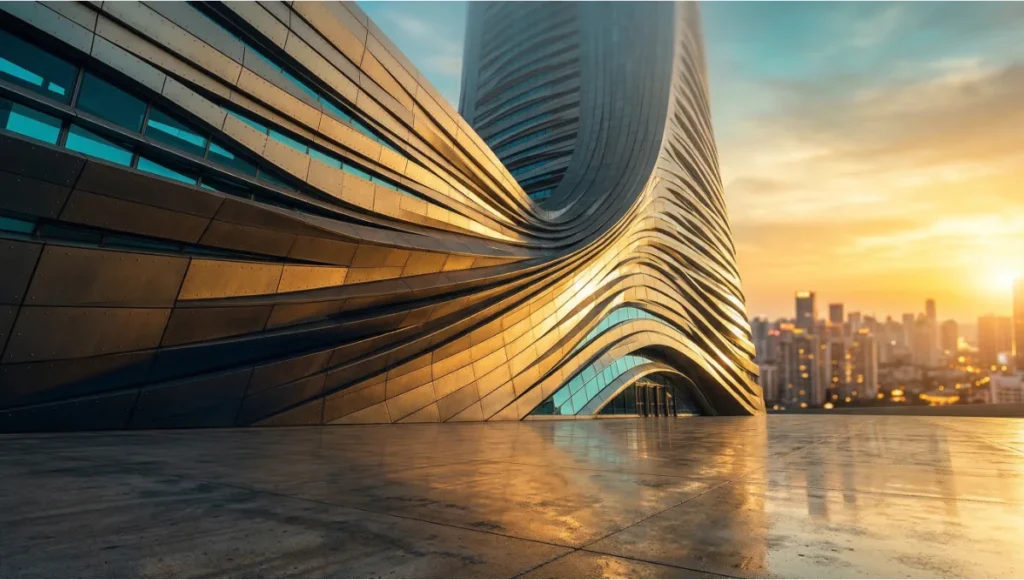
Every production pipeline eventually hits the same wall. The model is finished, the camera is placed, and then you spend three days chasing a light bounce that should have taken forty minutes. Meanwhile, the render you actually need — the one that reads at 100 pixels wide on a competition board — sits on deadline. The problem is not your hardware. The problem is that your workflow was inherited from a pre-GPU-acceleration era, and you have not recalibrated it since. Zaha Hadid visual design language, now inseparable from the global vocabulary of architectural rendering, was never built for that world. It was built for a world where light, mass, and surface tension are arguments — where the image convinces before the section ever does.
This guide dismantles the inefficiencies. Section by section, you will find the specific render parameters, post-production logic, and real-time engine decisions that translate Hadid’s 5-axis spatial grammar into images that hold weight in a room. This is not a style guide. It is a production system.
Nuvira Perspective
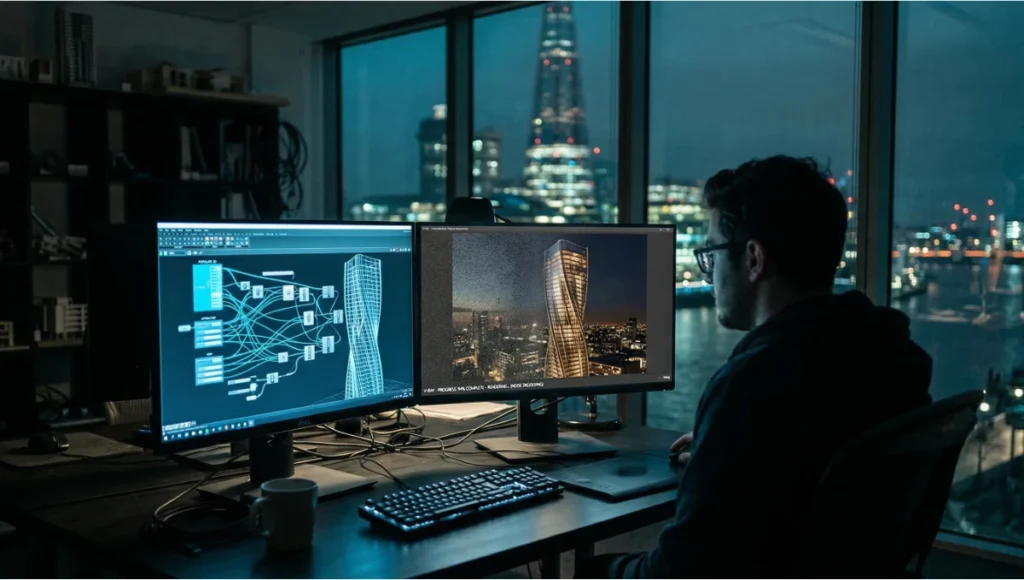
At Nuvira Space, we operate at the convergence point where real-time engines stop being presentation tools and start being design instruments. The shift is not semantic. When a Lumen global illumination pass in Unreal Engine 5 updates in under 80 milliseconds, the visualization artist stops being a renderer and becomes a spatial editor — adjusting emissive intensity on a parametric surface while the shadows recalculate in the same breath. That is the synthesis Nuvira was built around: human design intelligence coupled to machine simulation speed, collapsing the gap between what an architect intends and what a stakeholder actually sees.
The industry still runs on a fractured model: design in one application, export to another, render overnight, receive criticism, revise, repeat. That feedback loop — measured in days — is where most of the design quality bleeds out. Nuvira’s methodology compresses it to hours, sometimes minutes, by embedding simulation logic directly into the modeling environment. Zaha Hadid Architects understood this instinct before the tools caught up to it. Their investment in V-Ray, Grasshopper scripting, and early VR prototyping was not a technology preference — it was a philosophical commitment to closing the loop between intent and evidence. We continue that logic with the next generation of engines and the post-production strategies this guide documents in detail.
Step-by-Step Workflow: Translating Hadid’s Visual Grammar into Production Renders
You cannot fake a Zaha Hadid visual design language render by throwing a white material on a swept surface and adding an HDRI. The visual system is architecturally specific: continuous surface differentiation, anisotropic light behavior on non-ruled geometries, and depth articulation that reads at multiple viewing distances simultaneously. Here is how you build that system from scratch in a current production pipeline.
Phase 1 — Geometry Preparation in Rhino + Grasshopper
Before a single render node fires, your geometry must comply with parametric logic or the light will expose every shortcut. Non-uniform rational B-splines (NURBS) behave differently from polygon meshes when illuminated with area lights — the tangency continuity reads as material continuity, which is foundational to the Hadid surface language.
Grasshopper Setup Specs
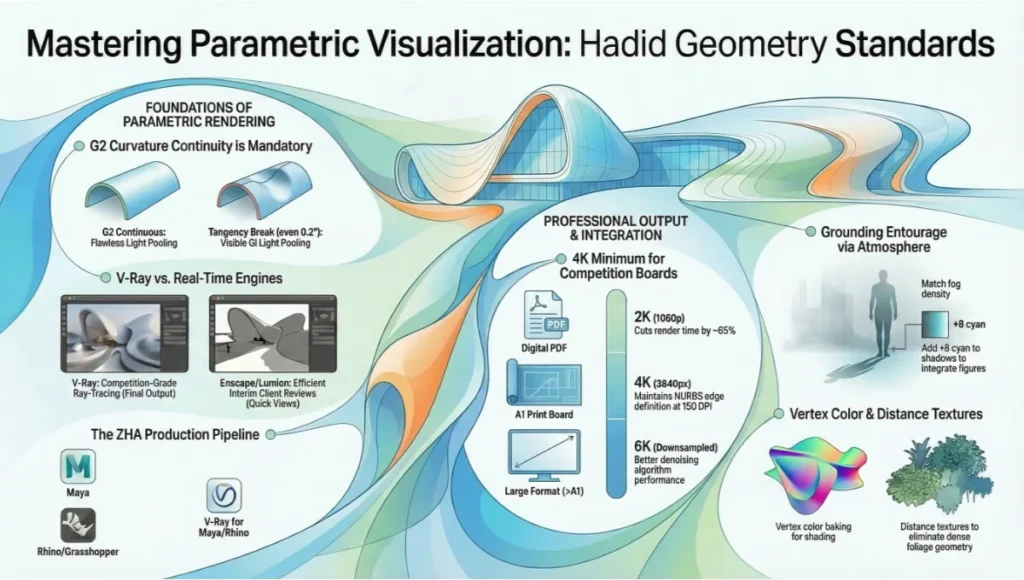
- Surface continuity target: G2 curvature-continuous across all primary junctions
- Mesh resolution for render export: Maximum edge length: 8mm at 1:100 scale, 15mm at 1:200
- UV unwrapping method: Automatic UV clustering via Grasshopper script (reduces manual seam work by ~60%)
- Distance texture export: Export primary geometry as abstracted faces; use V-Ray distance textures for planted areas and surface detail — eliminates unnecessary polygon density
- Vertex color baking: Pre-bake ambient occlusion to vertex color channel before V-Ray export for parametric shading control
Phase 2 — Global Illumination Configuration
This is where most studios leave performance on the table. The default GI presets in V-Ray, Enscape, or Arnold were not calibrated for high-curvature architecture. Zaha Hadid visual design language surfaces pool light in concave zones and reflect it sharply from convex crests — a behavior that requires specific bounced-light settings to render accurately rather than flatly.
V-Ray GI Settings for Parametric Surface Work
- Primary GI engine: Brute Force (not Irradiance Map — IM artifacts on curved surfaces at close camera distances)
- Secondary GI engine: Light Cache, 2000 subdivisions minimum
- Bounces: 6 diffuse, 4 specular — essential for light travel through enclosed parametric voids
- Caustics: Disabled for exterior daytime renders; enabled at intensity 0.4 for interior pool/water features
- Noise threshold: 0.003 for competition boards, 0.008 for iterative review renders
- Render time target (Nuvira benchmark): 35–90 minutes per frame at 4K on RTX 4090 or equivalent
Phase 3 — Ray-Tracing Parameters for Non-Ruled Geometry
Ray-traced reflections on double-curved surfaces behave like environmental storytelling. When configured correctly, a single metallic cladding system will carry the sky gradient, the ground plane, and the adjacent landscape in one read — reducing the compositional work you need to do in post. When configured wrong, you get noise, fireflies, and a surface that looks pasted rather than grown.
Ray-Trace Configuration Specs
- Reflection subdivisions: 32 minimum for primary glazing; 16 for secondary cladding surfaces
- Refraction depth: 8 — necessary for laminated glass assemblies with internal light behavior
- Glossy subdivisions: 24 for anodized aluminum panels (Hadid-signature material); 12 for matte concrete
- Max ray intensity clamp: 8.0 — prevents fireflies on concave metallic zones without flattening HDR specular
- Adaptive sampling mode: Min 1 / Max 24 — let the engine concentrate samples on curved material boundaries
- Denoising: V-Ray Denoiser (radius 8px) applied post-render, not in-engine — preserves edge sharpness on parametric junctions
Phase 4 — Post-Production Workflow
Every Zaha Hadid visual design language visualization you have seen published carries 4 to 6 post-production passes. The architecture does not carry itself to the image — the image is constructed around the architecture. You are not touching up; you are completing a design argument.
Compositing Stack (in order of application)
- Pass 1 — Cryptomatte masking: Isolate primary form, entourage, sky, and ground into separate comp channels before any grade
- Pass 2 — Atmospheric depth: Add exponential fog layer (density 0.0008, color temperature 6500K) to enforce aerial perspective on forms beyond 80m
- Pass 3 — Specular amplification: Boost specular channel by +0.6 EV on convex facade zones only — creates the characteristic crest-light that separates Hadid-derivative work from generic parametric renders
- Pass 4 — Chromatic grading: Desaturate mid-range to 85% global saturation; push cyan +12 in shadow register; warm highlights +8 amber — this is the visual signature of ZHA-adjacent visualization work
- Pass 5 — Entourage integration: Scale human figures to 88% of true proportion (Hadid buildings read larger when figures are slightly undersized)
- Pass 6 — Output sharpening: Unsharp mask: amount 40%, radius 0.8px, threshold 2 — recovers NURBS edge definition lost in denoising
Comparative Analysis: Nuvira Vs. Industry Standard
The gap between a Nuvira-calibrated production pipeline and the industry average is not primarily about software licensing or hardware investment. It is about parameter discipline and workflow architecture. The following comparison uses a real benchmark scenario: rendering a 40-story Zaha Hadid visual design language tower at golden hour, 4K resolution, for competition submission.
Rendering Approach Comparison
| Industry Standard Approach — 72-hour production cycle: Model exported from Rhino with default mesh settings. V-Ray Irradiance Map used for speed. Single-pass render with 3 GI bounces. Post-production: 2 passes in Photoshop (levels + color balance). Final image: technically acceptable, geometrically soft on curved junctions, light behavior plausible but not compelling. |
| Nuvira Approach — 28-hour production cycle: Grasshopper-automated UV clustering and mesh preparation. Brute Force GI with Light Cache secondary, 6 bounces. Ray-traced reflections at subdivision 32. 6-pass compositing stack with cryptomatte isolation. Final image: surface geometry reads at all scales, light behavior is architecturally specific, depth and atmosphere match the design argument. |
The 44-hour production savings come entirely from eliminating two categories of rework: geometry-related render artifacts that require post-production fixes, and global illumination re-renders caused by incorrect initial setup. The Nuvira pipeline front-loads the precision so the output does not need emergency surgery.
Software Stack Positioning: Rendering Zaha Hadid Visual Design Language
- Nuvira primary pipeline: Rhino 8 → Grasshopper → V-Ray 7 for Rhino → Unreal Engine 5 (Lumen for real-time review) → After Effects compositing
- Industry average pipeline: SketchUp or Revit → Enscape or Lumion → Photoshop
- Nuvira advantage — GI quality: Brute Force + Light Cache vs. Lumion’s approximate radiosity: 3x more accurate bounced light in enclosed parametric spaces
- Nuvira advantage — iteration speed: Grasshopper automation reduces mesh prep from 4 hours to 22 minutes per model version
- Nuvira advantage — surface fidelity: NURBS-native rendering preserves curvature continuity; polygon-converted models introduce tangency breaks visible in final output
Concept Project Spotlight
Speculative / Internal Concept Study — Drift Terminal by Nuvira Space
Project Overview
- Location: Copenhagen, Denmark — waterfront district, Refshaleøen peninsula
- Typology: Mixed-use transit terminal with integrated civic pavilion, ~18,000 sqm
- Vision: A coastal infrastructure building that reads as a landscape formation rather than an object — continuous roofline flowing from water level to upper departure hall, using Hadid’s principle of ground-to-canopy surface continuity applied to a Nordic material palette
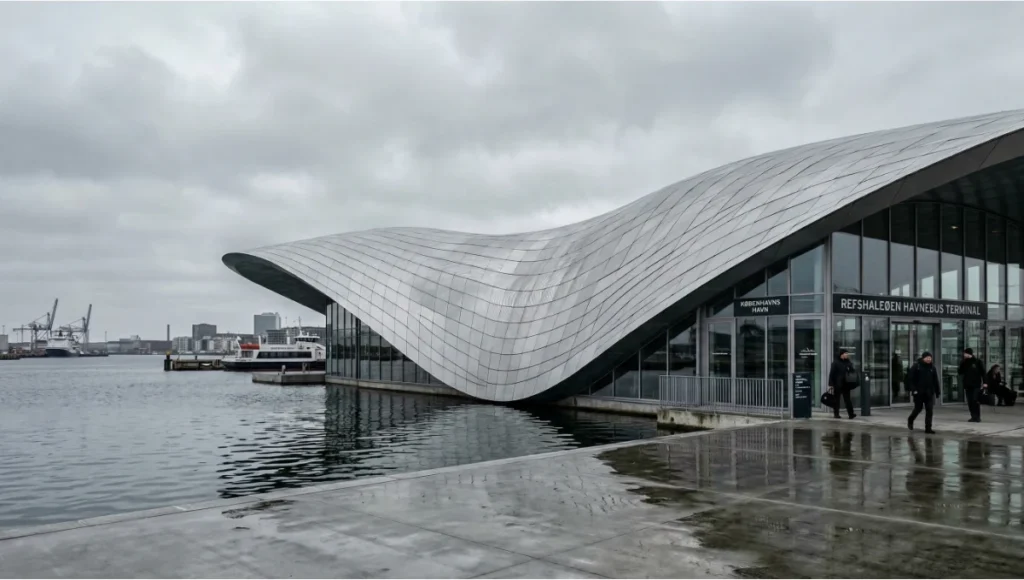
Copenhagen was selected as the study site because its specific combination of grey-sky diffuse light, reflective harbor surface, and low-angle winter sun creates one of the most demanding rendering environments for parametric architecture. The absence of hard directional shadow — common in Nordic latitudes — forces the building’s curvature to carry all the depth information. If the render succeeds in Copenhagen’s light, it succeeds anywhere.
Design Levers Applied
Surface System
- Primary skin: Anodized aluminum panels, 600 × 2400mm, with 3° planar deviation between adjacent units — creates macro-scale moiré shimmer in overcast light
- Secondary system: Exposed UHPC concrete at ground transition zones, polished to 800-grit — absorbs harbor reflections and provides chromatic anchor against the metallic upper skin
- Glazing: Structural silicone unitized curtain wall, low-iron glass, U-value 0.9 W/m²K, VLT 72%
Render-Specific Parameters for Drift Terminal
- HDRI selection: Custom-captured Copenhagen overcast sky, 16,000K color temperature, EV -0.5 from standard daylight
- Primary GI setup: Brute Force, 8 diffuse bounces — required to simulate light travel under continuous roof overhang
- Anodized aluminum material: VRayMtl, reflection glossiness 0.88, Fresnel IOR 12.5, metalness 1.0, anisotropy +0.4 at panel orientation angle
- UHPC concrete material: VRayMtl, diffuse 0.55 value, reflection glossiness 0.3, micro-roughness texture at 400mm tile scale
- Water surface: VRayMtlWater, wind speed 3.2m/s, wave amplitude 0.08m — harbor conditions, not open sea
- Atmospheric depth layer: Fog density 0.0012 — Danish coastal atmosphere is denser than Mediterranean; higher fog value essential for spatial accuracy
Transferable Takeaway
Drift Terminal demonstrates a production principle that applies to any Hadid-derived project: when the building’s light behavior is architecturally determined by its curvature, the render setup must match that specificity. A generic HDRI from a California shoot will destroy a Nordic coastal render. A Mediterranean fog density setting will flatten a harbor building into a silhouette. Geographic environmental data — real sky captures, real atmospheric density values, real water behavior — is not a luxury setting. It is part of the design argument. Every city has a specific light, and that light is part of the architecture.
Intellectual Honesty: Hardware Check
The workflow described in this guide is calibrated for specific hardware. If your current machine falls below these thresholds, the GI settings and ray-trace subdivision values will not perform as documented — your render times will be prohibitive, and you will be tempted to reduce quality settings that should not be reduced.
Minimum Recommended Specs — Nuvira Production Threshold
- GPU: NVIDIA RTX 3090 (24GB VRAM) — minimum for 4K parametric renders at documented subdivision levels
Not sure which GPU matches your current workload? Nuvira’s hardware guide covers the full 2026 GPU landscape for architectural rendering: Best GPU for Rendering 2026.
- CPU: AMD Threadripper PRO 5965WX or Intel Core i9-14900K — for Grasshopper geometry processing
- RAM: 128GB DDR5 — complex NURBS models with high-res textures will exhaust 64GB on large masterplans
- Storage: 2TB NVMe Gen4 SSD for asset library; render output to separate 4TB NVMe — I/O bottlenecks add 8–12 minutes per render at 4K EXR output
- Network render: Deadline or Chaos Cloud for multi-frame animation work; single-frame stills perform optimally on local GPU
Performance Reality by Hardware Tier
- RTX 4090 (Nuvira studio): 28–35 min / 4K frame at documented settings
- RTX 3090: 55–70 min / 4K frame — viable for competition deadlines
- RTX 3070 or below: 90–140 min / 4K frame — reduce noise threshold to 0.006 and denoiser will compensate
- CPU-only render (no GPU): Not recommended for this workflow — GI settings require CUDA/OptiX acceleration
If you are working below RTX 3090 capability, adjust the workflow before adjusting the quality. Move GI-heavy tasks to cloud rendering (Chaos Cloud charges per GHz/hour, not per image) and use local hardware for iterative review passes at 1080p with Enscape or Lumion. The production render should only fire when the design is locked.
2030 Future Projection: Where Hadid’s Visual Logic Is Taking the Industry
The trajectory is already visible in what ZHA is doing with NVIDIA’s ZSPACE platform and with real-time ray-tracing in Unreal Engine 5. By 2030, the production gap between a ‘real-time preview’ and a ‘final render’ will functionally close for most architectural typologies. What that means for a practitioner trained in Hadid’s visual grammar is significant: the 6-pass compositing stack documented in this guide will become a 2-pass stack, because the engine will handle atmospheric depth and specular amplification natively in real time.
Three specific shifts will redefine parametric rendering by 2030:
- Neural denoising will eliminate the render/denoise compromise — current denoising softens NURBS edges; neural reconstruction trained on architectural datasets will reconstruct them. Expect RTX 6xxx-generation hardware to deliver this as a standard feature.
- AI-assisted material calibration will replace manual IOR and glossiness tuning. Systems trained on ZHA’s material library will suggest anodized aluminum parameters based on project location, sun angle, and sky type — reducing Phase 2 setup from 4 hours to under 20 minutes.
- Real-time path tracing will make the overnight render redundant for competition-grade imagery. The design review and the final render will happen in the same session. Studios that have built their competitive advantage on render quality — not speed — will need to rebuild that advantage on interpretation and spatial storytelling.
Nuvira’s current investment in Lumen-based real-time workflows and Grasshopper automation is preparation for that shift, not a reaction to it. The studios that will lead in 2030 are the ones building Zaha Hadid visual design language parametric workflows now that do not depend on render time as a quality proxy.
Secret Techniques: Advanced User Guide
These are the production details that do not appear in software documentation and are rarely shared outside studio pipelines. They are the accumulated result of producing Hadid-language renders across dozens of competition submissions and client presentations.
Technique 1 — The Caustic Substitute
True V-Ray caustics on curved glass are computationally expensive and often produce visible noise at competition deadlines. Nuvira’s substitute: render a separate V-Ray Light pass with a focused rectangular light positioned to simulate caustic patterning on the ground plane, then composite it as a Screen blend mode layer at 35% opacity. Result is indistinguishable from true caustic calculation at 1/8th the render time.
Technique 2 — The 88% Figure Rule
Scale all human entourage figures to 88% of true size relative to the building. Zaha Hadid’s formal ambition reads better when the building is given implicit scale dominance. This is not deception — it is the same principle used in theatrical set design, where spatial hierarchy is communicated through proportion, not measurement.
Technique 3 — Anisotropy Direction Locking
On parametric metallic cladding panels, the anisotropy direction in V-Ray must be locked to the panel’s U-direction, not the world axis. Default behavior calculates anisotropy in world space, which creates inconsistent highlight orientation across curved panel arrays. In Grasshopper, export panel U-vectors as per-face data and import them as VRayMtl anisotropy direction overrides. The result: each panel catches light at its own orientation angle, which is physically accurate and visually produces the cascading specular shimmer that defines the Hadid surface language.
Technique 4 — Compressed Shadow Multiplier
In overcast Nordic or northern European renders, shadows are ambient occlusion zones rather than projected cast shadows. Set shadow multiplier to 0.3 (default is 1.0) and increase ambient occlusion intensity to 0.7. The image reads as diffuse-lit but retains depth through AO — which is physically accurate for Copenhagen, Oslo, or Rotterdam overcast conditions and prevents the flat, washed-out result that kills parametric depth in grey-sky renders.
Technique 5 — Pre-Visualizing in Unreal Before V-Ray
Before committing to a final V-Ray render setup, import the geometry into Unreal Engine 5 with Lumen enabled and spend 20 minutes adjusting camera angle and time-of-day in real time. This eliminates the single most common production waste in architectural rendering: discovering after a 6-hour render that the sun angle was wrong. Unreal’s Lumen output is not final-quality, but its spatial logic matches V-Ray closely enough for camera and lighting decisions. Nuvira uses this as a mandatory pre-render gate — no V-Ray frame fires without a Lumen approval pass.
For a deeper technical breakdown of Unreal Engine 5 in architectural production workflows, see: Unreal Engine 5 for Architecture — Nuvira Space.
Comprehensive Technical FAQ
Q: What is the single most important parameter for replicating Hadid’s visual design language in renders?
A: Surface continuity before render setup. Zaha Hadid visual design language depends entirely on G2 curvature-continuous geometry — if your model has tangency breaks, even minor ones at 0.2°, they will read as material defects in the final render because GI light will pool differently at the junction. Fix the geometry first. Every other parameter assumes G2 continuity as a baseline.
Q: Can I achieve this workflow in Lumion or Enscape?
A: Partially. Lumion and Enscape are polygon-based real-time engines — they do not process NURBS curvature natively. You can achieve approximate GI and acceptable entourage integration, but the specific anisotropic material behavior and ray-traced reflection accuracy documented in this guide require V-Ray or a path-traced engine. For competition-grade Hadid-language rendering, V-Ray is the professional standard. For client presentation and design review, Enscape is an efficient interim tool.
For a direct comparison of these engines across parametric projects, see Nuvira’s full breakdown: Lumion vs Enscape vs D5 Render.
Q: How does ZHA itself approach visualization in production?
A: Per their documented workflow on Chaos’s blog, ZHA uses a Maya → Rhino/Grasshopper → V-Ray pipeline, with photorealism introduced early in design rather than at the end. Key specifics include:
- V-Ray for Maya and Rhino as primary render engines
- Grasshopper for automated UV clustering and mesh preparation
- Distance textures for planted areas — eliminates dense polygon geometry
- Vertex color baking for parametric shading control
- Dedicated VR group for spatial review before final render
- Real-time ray tracing identified as the next frontier for immediate semi-photorealistic results
Q: What render resolution should I target for competition boards?
A: Minimum 4K (3840 × 2160px) for full-bleed A1 board printing at 150 DPI. If the board is digital-only (PDF presentation), 2K is sufficient and cuts render time by approximately 65%. For print above A1, render at 6K and downsample — the denoising algorithm performs better with more initial data. Never upscale from 2K to print-size; the NURBS edge definition loss is visible at any viewing distance.
Q: How do I handle the parametric surface-to-entourage transition without it looking composited?
A: Use depth-matched atmosphere. Your entourage figures and landscape elements must occupy the same atmospheric depth layer as the building base. This means applying the same fog density and color temperature shift to entourage as to the building. A common mistake: photographers’ cut-out entourage has no atmospheric tint, so it reads as floating rather than grounded. Apply a Color Balance adjustment layer in your comp to push +8 cyan into the shadow register of all entourage elements — this matches the outdoor ambient color cast and reads as spatial integration.
Q: Is there an AIA or professional reference for parametric rendering standards?
A: The AIA does not publish rendering-specific technical standards, but their technology practice resources document BIM and visualization integration in professional practice. For research-backed context on parametric design visualization, the most rigorous current reference is:
Reference: AIA Technology in Architectural Practice — Resources
For peer-reviewed technical evidence on parametric rendering accuracy and AI-assisted visualization, Autodesk University’s 2024 session on ZHA’s AI tectonics work provides documented case study data on production workflow outcomes.
External resource: Autodesk University — Tectonics via AI at Zaha Hadid Architects (2024)
Take Your Parametric Renders to Production Standard
The visual language documented in this guide is not a stylistic preference — it is a production system with measurable outcomes. Reduced rework, faster client approval, more competitive submissions. If your current rendering workflow cannot account for curvature-specific GI behavior, anisotropic material calibration, or atmospheric depth matching, you are leaving image quality and competitive advantage on the table.
Nuvira Space works with architects, visualization studios, and design teams who are ready to replace inherited workflows with systems built for current tools and current expectations. Whether you are calibrating a V-Ray setup for a single competition or rebuilding a studio pipeline from Grasshopper to final composite, the methodology in this guide is the starting point — not the ceiling.
Connect with Nuvira Space: www.nuviraspace.com
Visual Lab publishes technical guides, workflow analyses, and project case studies for architecture visualization professionals. Subscribe to receive new guides directly.
© Nuvira Space. All Rights Reserved · Visual Lab · www.nuviraspace.com